


"Old Black" Neil Young Replica
Hello folks.
This time I´m bringing you more than a custom work job, it´s a great conversion project of a Gibson Les Paul, the legendary guitar of the no less legendary Neil Young.
As you can see in the next pics, it is an instrument that has been with Neil for decades, becoming an icon by itself, as many other legendary guitars of other artists.


The guitar has been with him for a long time, with its famous peace & dove strap.

These pictures are the only ones with good quality that I´ve been able to find of the original Old Black. As you can see, the guitar has been heavily customized, with unique details which in this project I´ll try to imitate to the most detailed as possible.

The back of the guitar is no less unique than in the previous view, with its very unique features, some of them which remain a mystery even today. I´ll be talking about them soon.

Gibson manufactured replicas of the guitar, but without the "relic".

The guitar has lots of features that I will be detailing step by step as I go along with the project.
First of all, there is no "official" version where all the mods and different changes made to the guitar are explained. Almost all are just speculation based on the point in time when they were made, although some of them seem quite close to what really happened.
According to several sources, the original is a 1953 Les Paul Goldtop.

There are stories though that claim that the bridge was not a ´53 but the trapezoid one like the "first" Les Paul, so it would be a ´52 bought in ´53.

Who knows?. Anyway it seems that when Neil Young bought it used in 1968 it had been already modded. The bridge pup was replaced for a Gretsch Dynasonic_DeArmond, that Neil replaced in 1972 for a Firebird mini humbucker which is the one on the guitar nowadays and gives the guitar its unique tone. This pickup works in a 2-way thanks to a mini switch located between the volume and tone knobs, which allows to have the pickup signal through the circuitry or straight to the output jack.
In 1969, a Bigsby B7 + an ABR-1 bridge were added. Exact year is not known but it´s possible that also in 1969 the Schaller M6 tuners were added, along with a few other features which I´ll describe later.
As a start point, I received a 2010 Les Paul Studio 50s, the Gibson budget version of a ´56 Goldtop. The original owner replaced the truss rod cover for a Deluxe´s.

No neck binding, luckily the inlays are the same ones as in a Standard Les Paul.

"Natural" binding in the body.

Gibson P90s in both bridge and neck positions.

Detail of the body "binding", not quite well made, by the way.

4 piece mahogany body.

Deluxe machine tuners. I deleted the serial number, but the year is visible in the pic.

Metal sheet to attach the P90. It will be removed.

I will also remove or rather "hide" the holes left by the StopBar, as Old Black doesn´t have have it.

Ok, after showing you what the guitar looked like, I´ll start to mechanize it to start transforming it or in better words, "give" it the appearance of a 1953 Goldtop.

To do this I start milling the neck. It was a very thorough job as I had to create a special press from scratch where it fixed tightly the fretboard and at the same time allowed easy access for the press. It was a fret-by-fret work on both sides, but as you can see the results were excellent.

Same technique was applied to the body. I milled the binding cavity thus obtaining the correct looks of an original 50s Goldtop.

Detail of how perfectly the binding fits.

Hello folks.
This time I´m bringing you more than a custom work job, it´s a great conversion project of a Gibson Les Paul, the legendary guitar of the no less legendary Neil Young.
As you can see in the next pics, it is an instrument that has been with Neil for decades, becoming an icon by itself, as many other legendary guitars of other artists.
The guitar has been with him for a long time, with its famous peace & dove strap.
These pictures are the only ones with good quality that I´ve been able to find of the original Old Black. As you can see, the guitar has been heavily customized, with unique details which in this project I´ll try to imitate to the most detailed as possible.
The back of the guitar is no less unique than in the previous view, with its very unique features, some of them which remain a mystery even today. I´ll be talking about them soon.
Gibson manufactured replicas of the guitar, but without the "relic".
The guitar has lots of features that I will be detailing step by step as I go along with the project.
First of all, there is no "official" version where all the mods and different changes made to the guitar are explained. Almost all are just speculation based on the point in time when they were made, although some of them seem quite close to what really happened.
According to several sources, the original is a 1953 Les Paul Goldtop.
There are stories though that claim that the bridge was not a ´53 but the trapezoid one like the "first" Les Paul, so it would be a ´52 bought in ´53.
Who knows?. Anyway it seems that when Neil Young bought it used in 1968 it had been already modded. The bridge pup was replaced for a Gretsch Dynasonic_DeArmond, that Neil replaced in 1972 for a Firebird mini humbucker which is the one on the guitar nowadays and gives the guitar its unique tone. This pickup works in a 2-way thanks to a mini switch located between the volume and tone knobs, which allows to have the pickup signal through the circuitry or straight to the output jack.
In 1969, a Bigsby B7 + an ABR-1 bridge were added. Exact year is not known but it´s possible that also in 1969 the Schaller M6 tuners were added, along with a few other features which I´ll describe later.
As a start point, I received a 2010 Les Paul Studio 50s, the Gibson budget version of a ´56 Goldtop. The original owner replaced the truss rod cover for a Deluxe´s.
No neck binding, luckily the inlays are the same ones as in a Standard Les Paul.
"Natural" binding in the body.
Gibson P90s in both bridge and neck positions.
Detail of the body "binding", not quite well made, by the way.
4 piece mahogany body.
Deluxe machine tuners. I deleted the serial number, but the year is visible in the pic.
Metal sheet to attach the P90. It will be removed.
I will also remove or rather "hide" the holes left by the StopBar, as Old Black doesn´t have have it.
Ok, after showing you what the guitar looked like, I´ll start to mechanize it to start transforming it or in better words, "give" it the appearance of a 1953 Goldtop.
To do this I start milling the neck. It was a very thorough job as I had to create a special press from scratch where it fixed tightly the fretboard and at the same time allowed easy access for the press. It was a fret-by-fret work on both sides, but as you can see the results were excellent.
Same technique was applied to the body. I milled the binding cavity thus obtaining the correct looks of an original 50s Goldtop.
Detail of how perfectly the binding fits.
"Old Black" Neil Young Replica
Same as the neck binding.

Finalizing some small details in order to have it fit like a glove in the neck

and also in the body. Regarding this, a little “trick” for it to not look like the work was not original,

I´ve inserted the body binding inside the neck

Firstly i put the binding work all over the body and cover it tightly with tape

Detail of the binding fitting inside the neck

And I left it to dry out.

After the body binding work I started with the neck binding. I inserted the dots and made it look like an LP Standard with the “nibs” binding.

Same as in the bottom area.

Also same as on the other side. Observe the detail of how it nicely fits the binding with the body contour. Shortly it will be factory-looking after levelling all the surfaces.

A better view of the binding inside the neck

Working on the binding cut

nice overview of the binding glued to the body

The frets are levelled, the fretboard hydrated and other polishing details. The neck looks like this.

The difference now compared with the original pics is very noticeable. Now this is a 100% Standard neck.


Old Black´s back has unique features that are unknown even to this day. The body is crossed through with a band of irregular thickness. Nobody knows with absolute certainty whether it was because of an accident, an ornament, or who knows… The band goes all the way down to the strap button from the top of the headstock.

At the far end it starts narrowing until it reaches the neck and it thickens again and stretches up until the top of the headstock.

Same as the neck binding.
Finalizing some small details in order to have it fit like a glove in the neck
and also in the body. Regarding this, a little “trick” for it to not look like the work was not original,
I´ve inserted the body binding inside the neck
Firstly i put the binding work all over the body and cover it tightly with tape
Detail of the binding fitting inside the neck
And I left it to dry out.
After the body binding work I started with the neck binding. I inserted the dots and made it look like an LP Standard with the “nibs” binding.
Same as in the bottom area.
Also same as on the other side. Observe the detail of how it nicely fits the binding with the body contour. Shortly it will be factory-looking after levelling all the surfaces.
A better view of the binding inside the neck
Working on the binding cut
nice overview of the binding glued to the body
The frets are levelled, the fretboard hydrated and other polishing details. The neck looks like this.
The difference now compared with the original pics is very noticeable. Now this is a 100% Standard neck.
Old Black´s back has unique features that are unknown even to this day. The body is crossed through with a band of irregular thickness. Nobody knows with absolute certainty whether it was because of an accident, an ornament, or who knows… The band goes all the way down to the strap button from the top of the headstock.
At the far end it starts narrowing until it reaches the neck and it thickens again and stretches up until the top of the headstock.
Old Black Neil Young Replica
There are lots of stories about it, but nobody knows exactly why. We can only speculate on the reasons based on historical facts. It´s supposed that the guitar suffered an accident. This assumption is based on two details. One is the maple band that stretches all along the body and neck, the other is the Crown inlay in the headstock.
As you all know, the Les Paul model went through big changes in 1961 because of the low sales volumes of the model, and Gibson decided to re-design it. Les Paul himself opposed to this model (SG), saying “it wasn´t his guitar”. Even though there were some runs of the guitar (SG) with the Les Paul signature stamped on them, Gibson gave in and started to use the “crown” inlay on the headstock. Below you can see a picture of an original headstock from around that time. They also experimented with different scrolls and combined mahogany and maple necks trying to solve the common neck breaks.

Hence those circumstances the theory that the guitar must´ve suffered an accident around those dates and the neck was replaced. This fact is more credible as most repaired guitars from that time show the Crown inlay headstock. That´s why Old Black has the Crown inlay instead of the Les Paul signature, apart from another important detail that I will comment on at a later stage.


The milling is quite difficult, as you can see, as it´s not the same to work on “virgin” wood and give it the shape needed than working with an already crafted instrument where the luthier has to adapt to the irregular shapes already in the guitar.

The channeling from the bottom until

the headstock

Preparing the hard maple strip for

giving it shape thermally.

Checking that everything fits correctly

readjusting the levels

and glueing it, beginning from the bottom area

then all along the neck

Once the maple strip is matched and glued to the curved surface of the neck, it looks like a composite neck.

Detail of the back of the neck.


A couple views of the body´s back

and also the front


A 1/16” sheet is on the surface of the headstock. It will need to be removed as it´s impossible to make the relic effect as it is. Acrylics don´t tear nor break in the same way as wood, hence making it very difficult to manage the same relic effect, unless using some kind of pigment.

There are lots of stories about it, but nobody knows exactly why. We can only speculate on the reasons based on historical facts. It´s supposed that the guitar suffered an accident. This assumption is based on two details. One is the maple band that stretches all along the body and neck, the other is the Crown inlay in the headstock.
As you all know, the Les Paul model went through big changes in 1961 because of the low sales volumes of the model, and Gibson decided to re-design it. Les Paul himself opposed to this model (SG), saying “it wasn´t his guitar”. Even though there were some runs of the guitar (SG) with the Les Paul signature stamped on them, Gibson gave in and started to use the “crown” inlay on the headstock. Below you can see a picture of an original headstock from around that time. They also experimented with different scrolls and combined mahogany and maple necks trying to solve the common neck breaks.
Hence those circumstances the theory that the guitar must´ve suffered an accident around those dates and the neck was replaced. This fact is more credible as most repaired guitars from that time show the Crown inlay headstock. That´s why Old Black has the Crown inlay instead of the Les Paul signature, apart from another important detail that I will comment on at a later stage.
Back to the neck work, some luthiers and
manufacturers of Old Black replicas, have chosen to paint the stripe
located at the back, which is a lot easier and not all have the
equipment/ability to recreate it using an already built guitar (it´d be
easier if starting from scratch). In this project, the owner and myself
want the replica to be as close to the original as possible, hence the
extra work.
The solution is to create a maple stripe inlaid
in the guitar, for which firstly the routing has to be done. To do this
I had to design and make special tools for the job.
Once done you can see channeling through the
body and neck is not very deep, ensuring not to reach the truss rod, but
enough to strengthen the body and neck and look good on the aesthetic
side of things.
The milling is quite difficult, as you can see, as it´s not the same to work on “virgin” wood and give it the shape needed than working with an already crafted instrument where the luthier has to adapt to the irregular shapes already in the guitar.
The channeling from the bottom until
the headstock
Preparing the hard maple strip for
giving it shape thermally.
Checking that everything fits correctly
readjusting the levels
and glueing it, beginning from the bottom area
then all along the neck
Once the maple strip is matched and glued to the curved surface of the neck, it looks like a composite neck.
Detail of the back of the neck.
Interestingly, the “channeling” does not have
maple all along its surface. There´s an area where not only the shape
it´s irregular, but if you look closely at the first pics, you´ll notice
it´s empty. Another mystery to clarify…
After the previous work had been done, I started
to work on the famous “mystery” back plate, which remains unknown as to
why it´s there. Nobody knows what´s underneath. Lots of speculation on
the possibility that the body of the guitar also suffered an accident
and the plate is there as a structural reinforcement, another says it´s
just some access to adjust the bridge (not a real option as it´s in a
different position, in any case it does match the Bigsby position on the
front of the body). In my opinion the explanation is not as complex as
the stories circulating around: possibly when they tried to add the
mini-switch currently located between the volume and tone knobs and
realized that it was in the wrong position, they had to move it to the
right place and therefore the cavity had to be covered. In our case,
we´re only interested in the aesthetics and it´s more than enough to
just mill it slightly in order to fit the plate (same as the pickup
selector cover).
A couple views of the body´s back
and also the front
Another noticeable modification is in the
headstock. It´s not known whether the binding was removed or if the
intention was to add it. In any case, the space for it is there and will
also be done in our guitar.
Nevertheless here´s one of the things that
really surprises me from a well renowned company. One would expect to
find wood, but in this occasion what I found was an acrylic sheet. I
sanded the Gibson logo and it wouldn’t go away, and I thought it was
some really deep serigraphy work that would disappear as I kept sanding
like in other guitars, but soon I realized it´s golden acrylic lettering.
It´s a great idea but not for a musical instrument. Breaks in this type
of material are much more difficult to repair as when it cracks it “explodes”.
A 1/16” sheet is on the surface of the headstock. It will need to be removed as it´s impossible to make the relic effect as it is. Acrylics don´t tear nor break in the same way as wood, hence making it very difficult to manage the same relic effect, unless using some kind of pigment.
Old Black Neil Young Réplica
Whilst I decide to do with the headstock issue, I begin to treat the metal parts and relic them artificially.
The Bigbsy, although bought 2nd hand it was as good as new. First step was to remove the paint that originally covers it
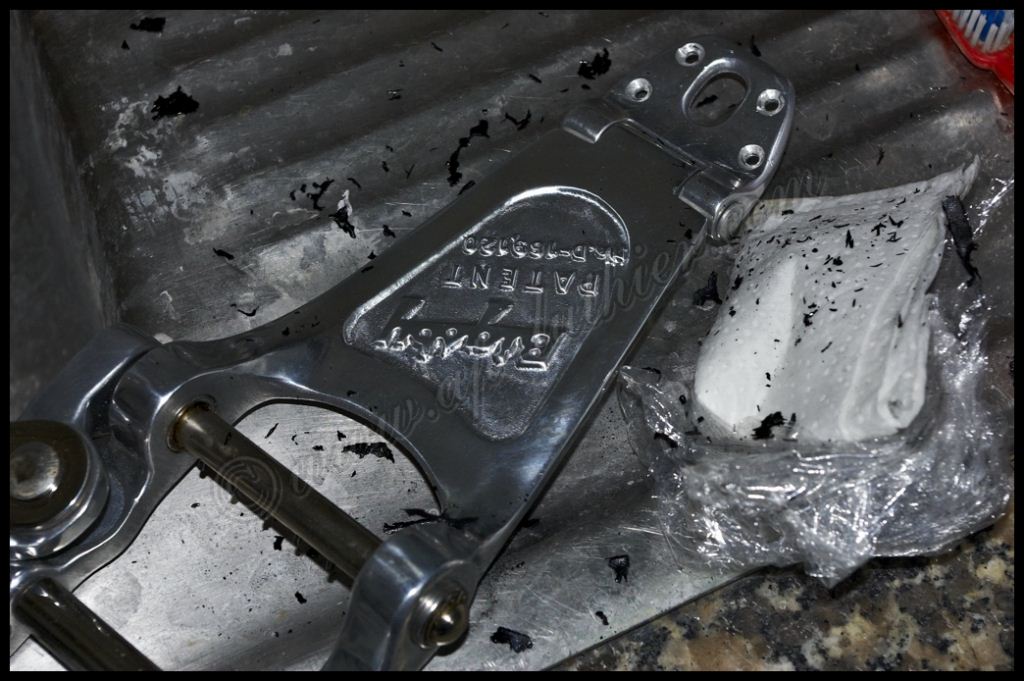
Then I begin to treat the metal sheets with different substances that attack metals. One has to be careful with these as depending on the material they react differently to different chemicals. Another point to consider is that the relic is not achieved quickly, but the materials have to be treated several times in order for them to have a natural "old" and "used" appearance.

You can´t fake the passing of several decades in a few minutes, but you can in a few days

The Bigsby is made out of several different metals, among them chrome steel, aluminum, stainless steel, etc. This makes the relic´ing more difficult, as to each metal a different chemical and treatment has to be applied, and use different "tricks" to get an optimum result to get from this

to this.

One must be really patient when working on the metals, as we have to leave the chemicals work on them on different stages. To do it all at once, the results wouldn´t be optimal as expected.
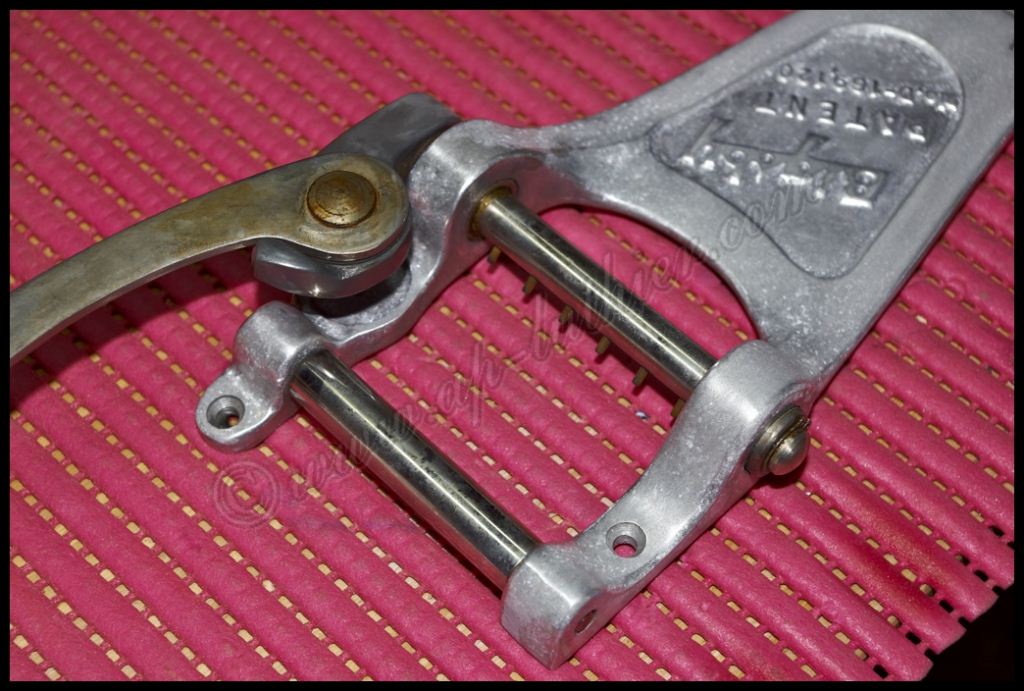
Detail of the relic´ing

I took the opportunity to leave a similar dent as in Old Black´s Bigsby. You can see here some of the metals that the bridge contains and their different reactions and patina
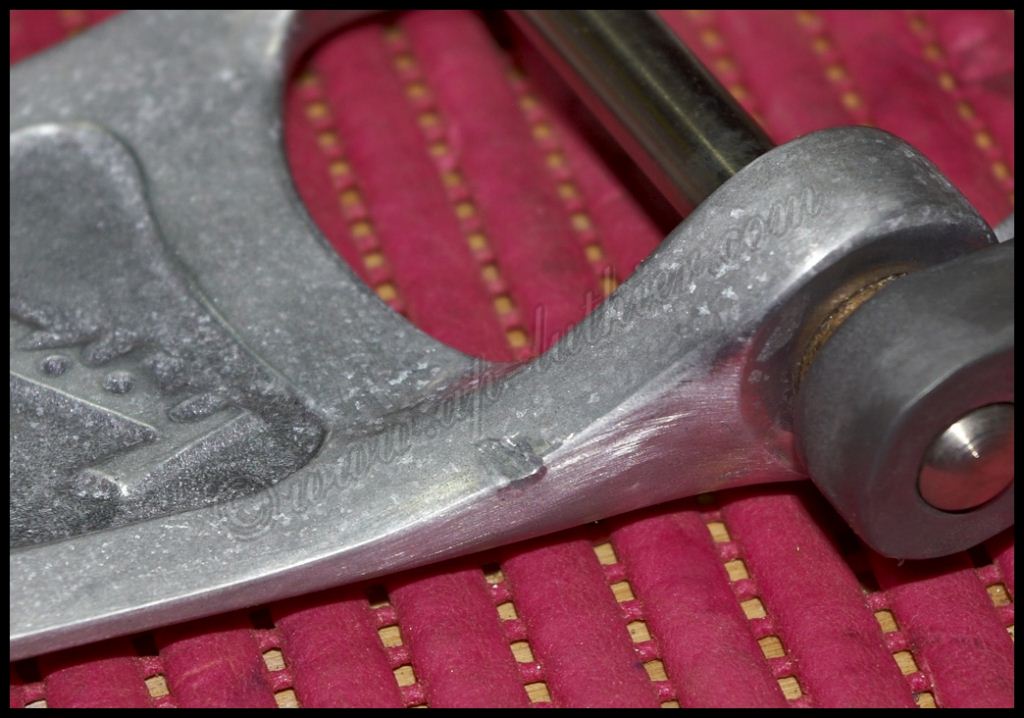
In some pics of Old Black, it can be observed how the top end of the Bigsby handle shows a copper-ish colour. My theory and interpretation of this fact is that at the time the Bigsby was installed, it didn´t had a stainless steel handle like a current production Bigsby. This shows a great improvement over the old one as the sweat and the normal wear of the use with the hand slowly wears out the finish. Stainless steel was not so commonly used at the time but chromed metals were used regularly.
A more durable way of plating entailed copper-plating the steel piece before the chrome-plating. This was being done electrolytically the same way as chrome-plating but with the advantage that copper adheres more easily to steel than chrome and also to nickel. It´s like the perfect transition for this type of work as it´s more durable. Nowadays this method still is in use for precision parts/machinery and others.
The Bigsby handle in Old Black shows in the tip the signs of long time use and abuse. Because of this, the chrome and nickel are worn out and the copper can be seen.
Regrettably stainless steel doesn´t have any protective cover, so the more it´s used the more polished the piece will get, and this prevents us to recreate this effect... but as I can´t leave it like this, I devised an easy but very effective solution, which was to weld a piece of copper onto the tip of the handle. I could´ve glued it, but it wouldn´t show the effect i was looking after, so i started

Once welded I simulated the use with sand paper and files...

The bridge is now relic´d and very similar to Old Black´s. Now the owne will have to add his own "touch" to acquire the original appearance even more

I have finally decided to remove the acrylic surface of the headstock, which appeared to be layers of tinted paper with black epoxi, similar as to carbon fibre is made, and I will replace it for a Honduran mahogany top.
Curiously, you can see there is a very noticeable difference in the grain of the wood between the Honduran mahogany and the mahogany currently employed by Gibson
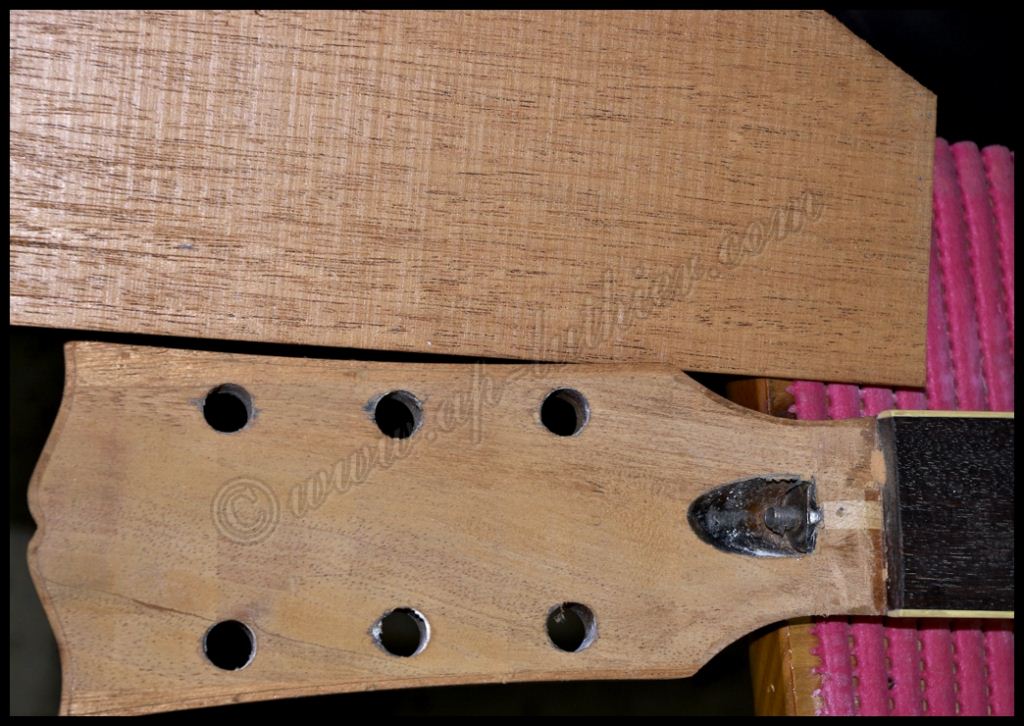
Working on the headstock

in order to insert the original manufacturer´s logo
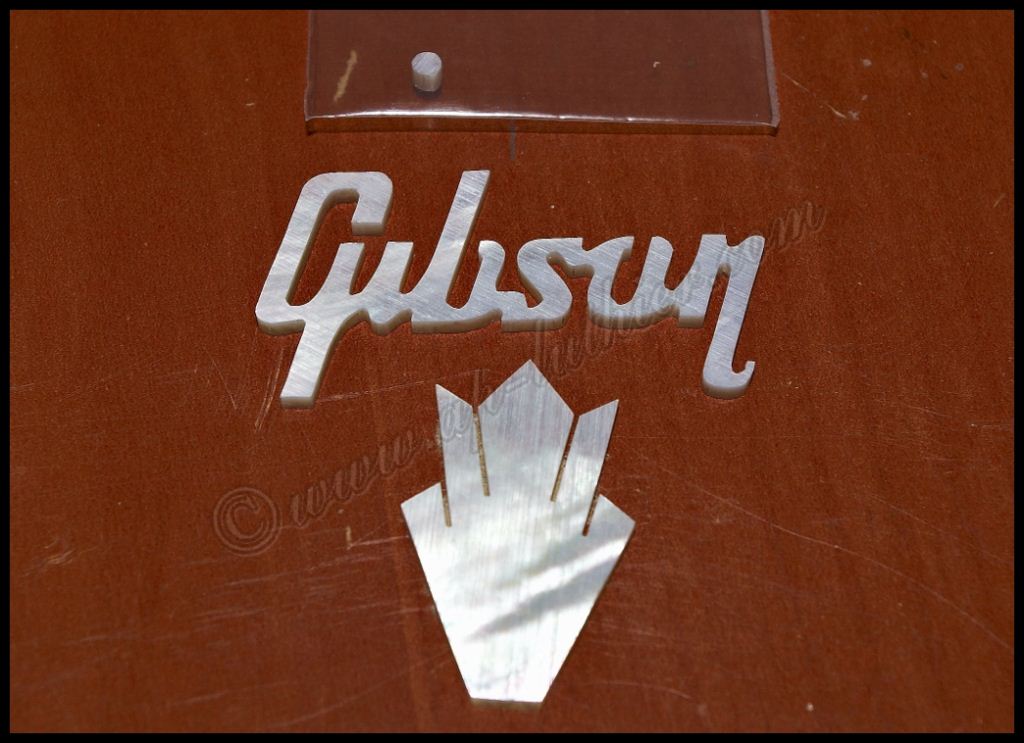
I prepare the perimeter of the Gibson lettering
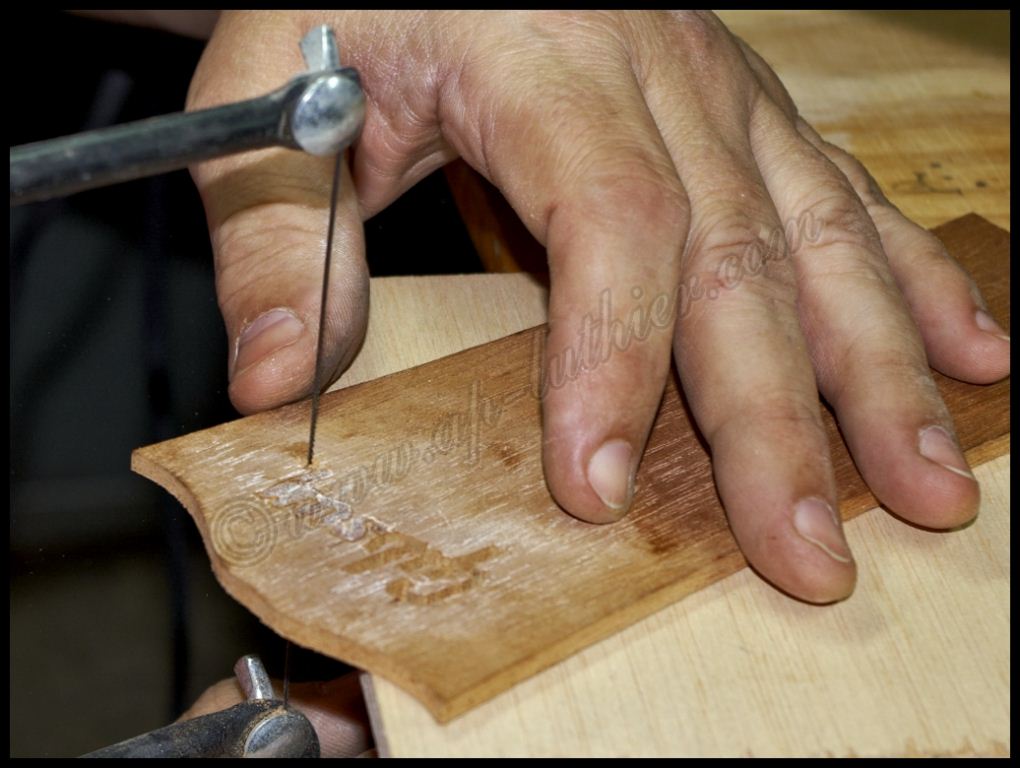
Same with the crown inlay, this way the guitar will look much like the ´53 original mop inlays
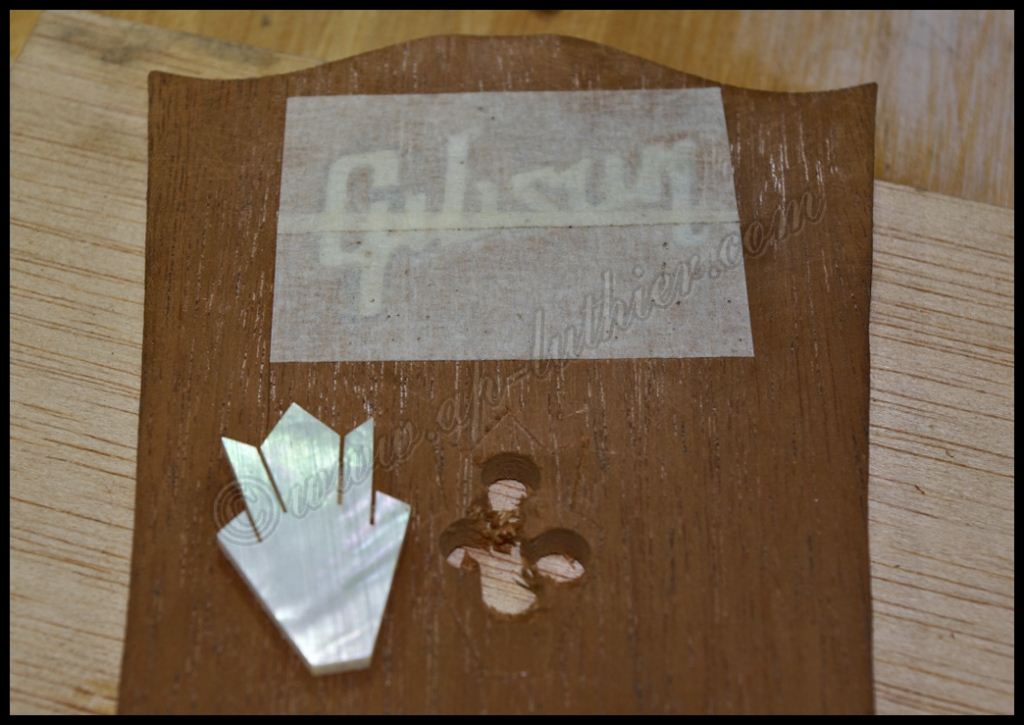
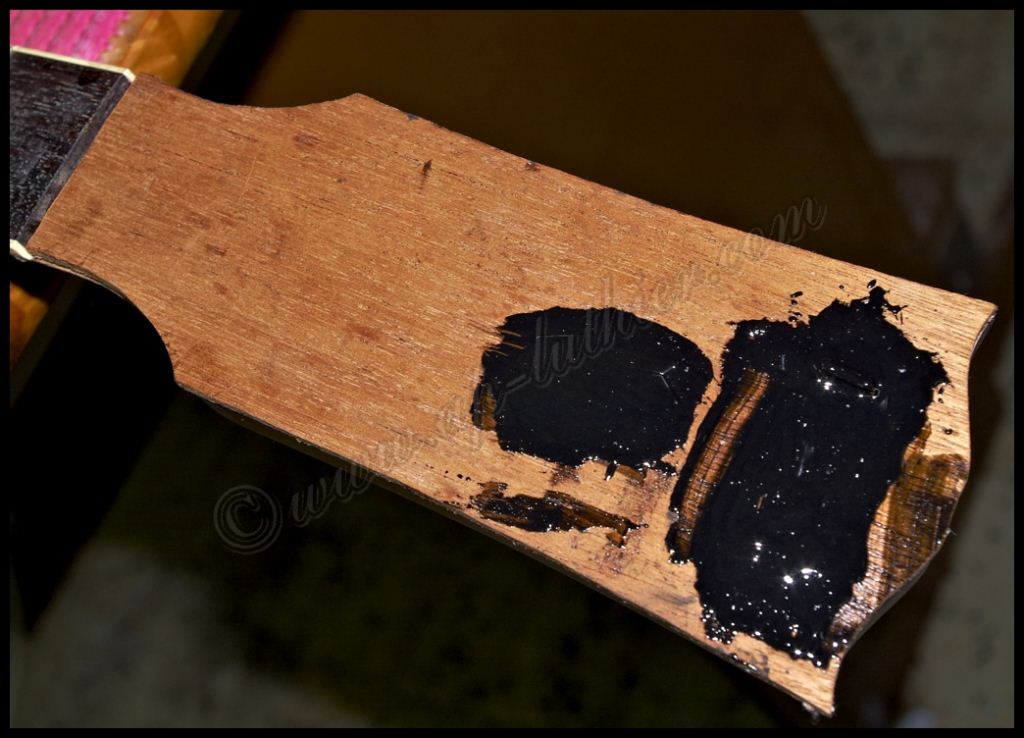
I make the instertion of the logos with black epoxi, as the headstock will also be black in its entirety, then i leave to harden.
In the meantime, i cut the shapes of the back plates in duraluminum.

With the lathe I work on them to give them the exact shape and drill the holes
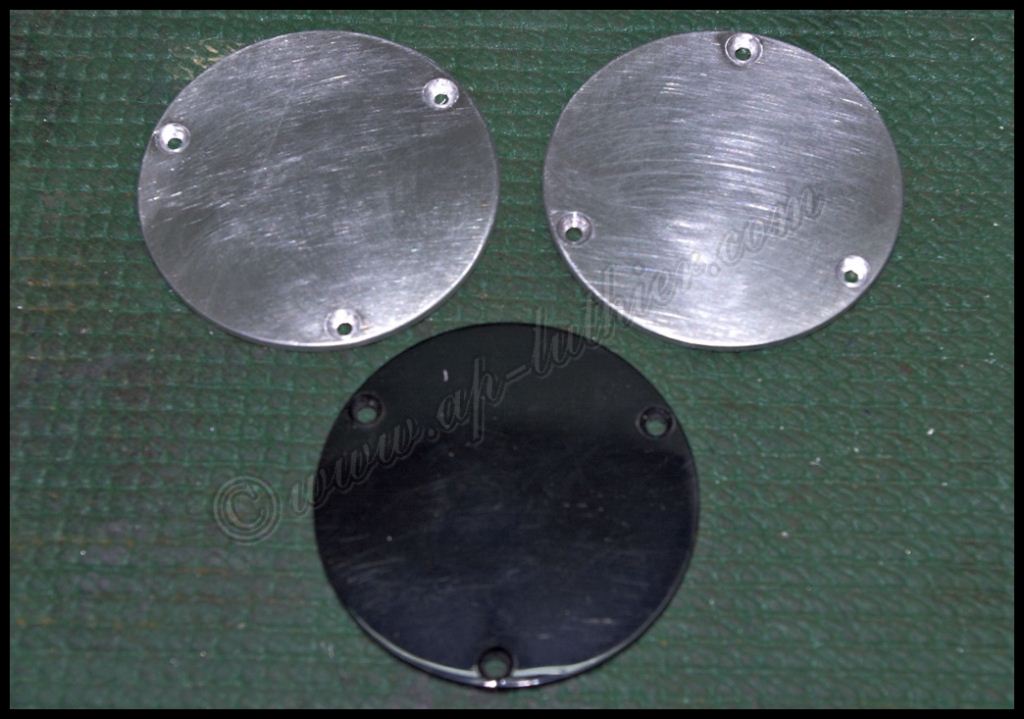
Then I make sure everything fits ok
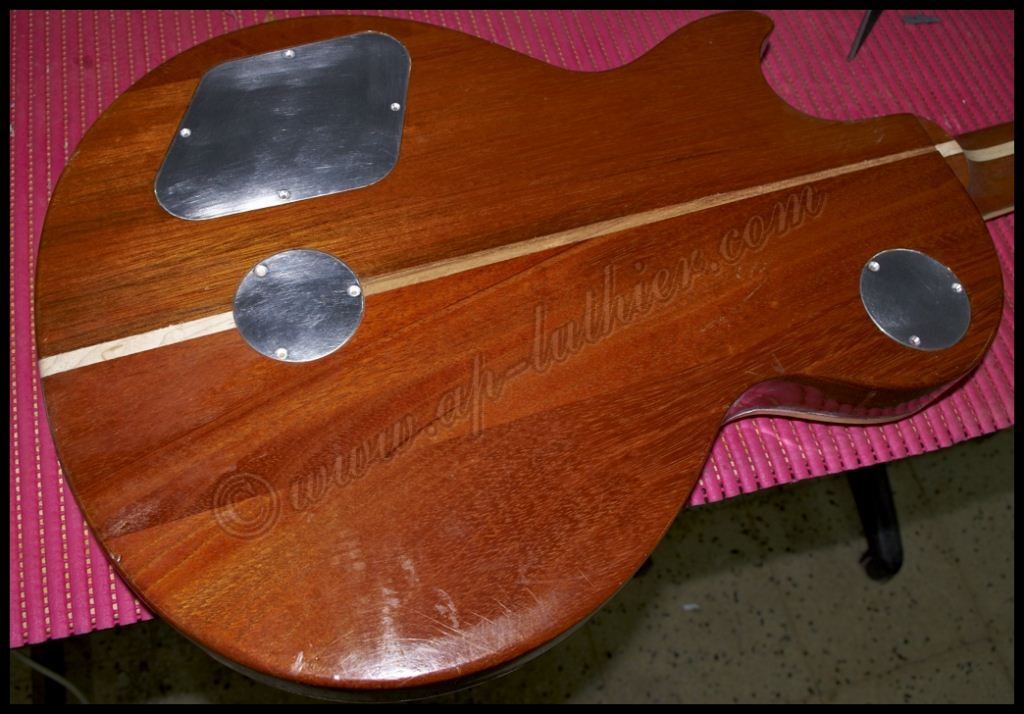
Whilst I decide to do with the headstock issue, I begin to treat the metal parts and relic them artificially.
The Bigbsy, although bought 2nd hand it was as good as new. First step was to remove the paint that originally covers it
Then I begin to treat the metal sheets with different substances that attack metals. One has to be careful with these as depending on the material they react differently to different chemicals. Another point to consider is that the relic is not achieved quickly, but the materials have to be treated several times in order for them to have a natural "old" and "used" appearance.
You can´t fake the passing of several decades in a few minutes, but you can in a few days
The Bigsby is made out of several different metals, among them chrome steel, aluminum, stainless steel, etc. This makes the relic´ing more difficult, as to each metal a different chemical and treatment has to be applied, and use different "tricks" to get an optimum result to get from this
to this.
One must be really patient when working on the metals, as we have to leave the chemicals work on them on different stages. To do it all at once, the results wouldn´t be optimal as expected.
Detail of the relic´ing
I took the opportunity to leave a similar dent as in Old Black´s Bigsby. You can see here some of the metals that the bridge contains and their different reactions and patina
In some pics of Old Black, it can be observed how the top end of the Bigsby handle shows a copper-ish colour. My theory and interpretation of this fact is that at the time the Bigsby was installed, it didn´t had a stainless steel handle like a current production Bigsby. This shows a great improvement over the old one as the sweat and the normal wear of the use with the hand slowly wears out the finish. Stainless steel was not so commonly used at the time but chromed metals were used regularly.
A more durable way of plating entailed copper-plating the steel piece before the chrome-plating. This was being done electrolytically the same way as chrome-plating but with the advantage that copper adheres more easily to steel than chrome and also to nickel. It´s like the perfect transition for this type of work as it´s more durable. Nowadays this method still is in use for precision parts/machinery and others.
The Bigsby handle in Old Black shows in the tip the signs of long time use and abuse. Because of this, the chrome and nickel are worn out and the copper can be seen.
Regrettably stainless steel doesn´t have any protective cover, so the more it´s used the more polished the piece will get, and this prevents us to recreate this effect... but as I can´t leave it like this, I devised an easy but very effective solution, which was to weld a piece of copper onto the tip of the handle. I could´ve glued it, but it wouldn´t show the effect i was looking after, so i started
Once welded I simulated the use with sand paper and files...
The bridge is now relic´d and very similar to Old Black´s. Now the owne will have to add his own "touch" to acquire the original appearance even more
I have finally decided to remove the acrylic surface of the headstock, which appeared to be layers of tinted paper with black epoxi, similar as to carbon fibre is made, and I will replace it for a Honduran mahogany top.
Curiously, you can see there is a very noticeable difference in the grain of the wood between the Honduran mahogany and the mahogany currently employed by Gibson
Working on the headstock
in order to insert the original manufacturer´s logo
I prepare the perimeter of the Gibson lettering
Same with the crown inlay, this way the guitar will look much like the ´53 original mop inlays
I make the instertion of the logos with black epoxi, as the headstock will also be black in its entirety, then i leave to harden.
In the meantime, i cut the shapes of the back plates in duraluminum.
With the lathe I work on them to give them the exact shape and drill the holes
Then I make sure everything fits ok
Old Black Neil Young Replica
And I start with the relic´ing of the plates, mimicking all details on the original. a pic of the central back plate

Detail of the pickup switch cover plate

And detail of the electronics plate before applying the chemicals, which act very slowly but provide the heavy relic´ing effect that i want
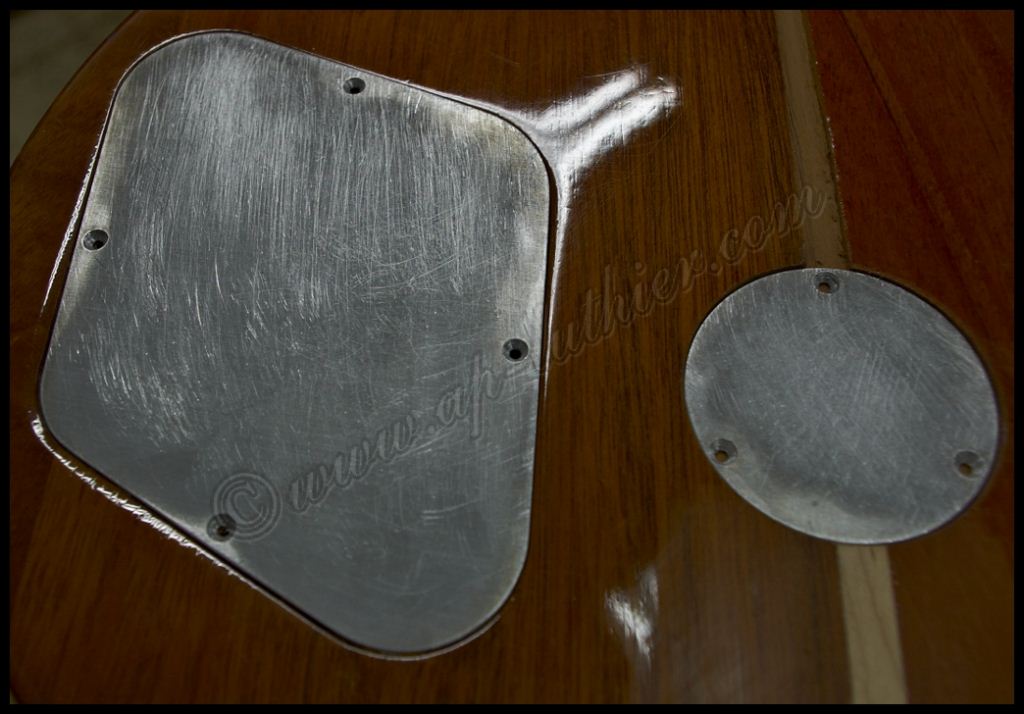
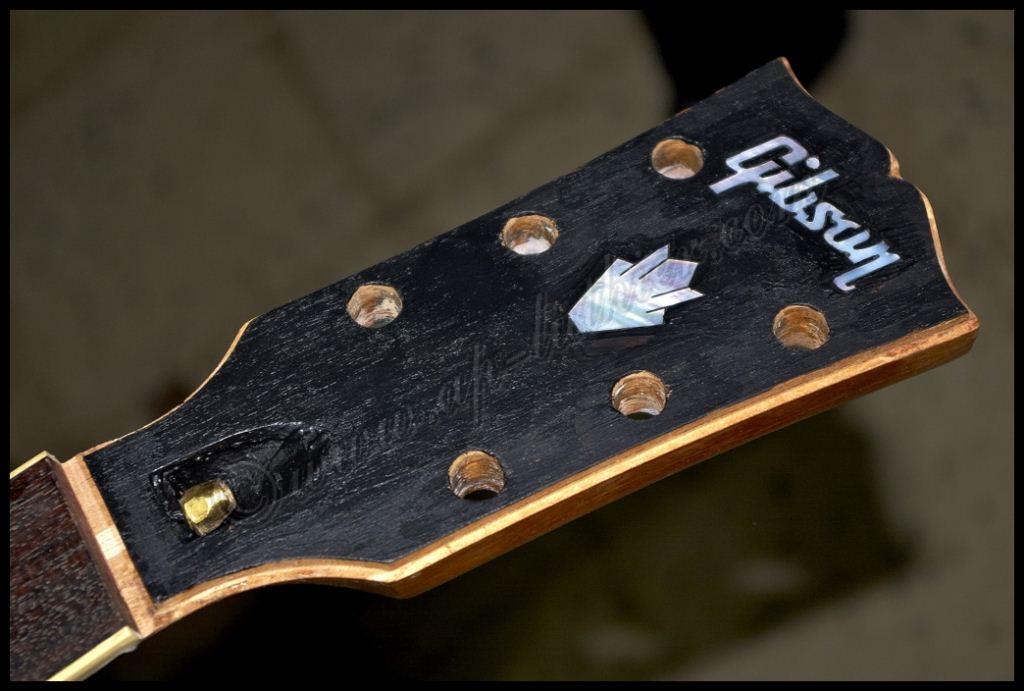
Whilst all this heppens and the chemicals work their magic, I keep working on the headstock. Now it´s totally made of mahogany and more historically correct. I mill the space necessary for the nut and then rectify the access to the truss rod
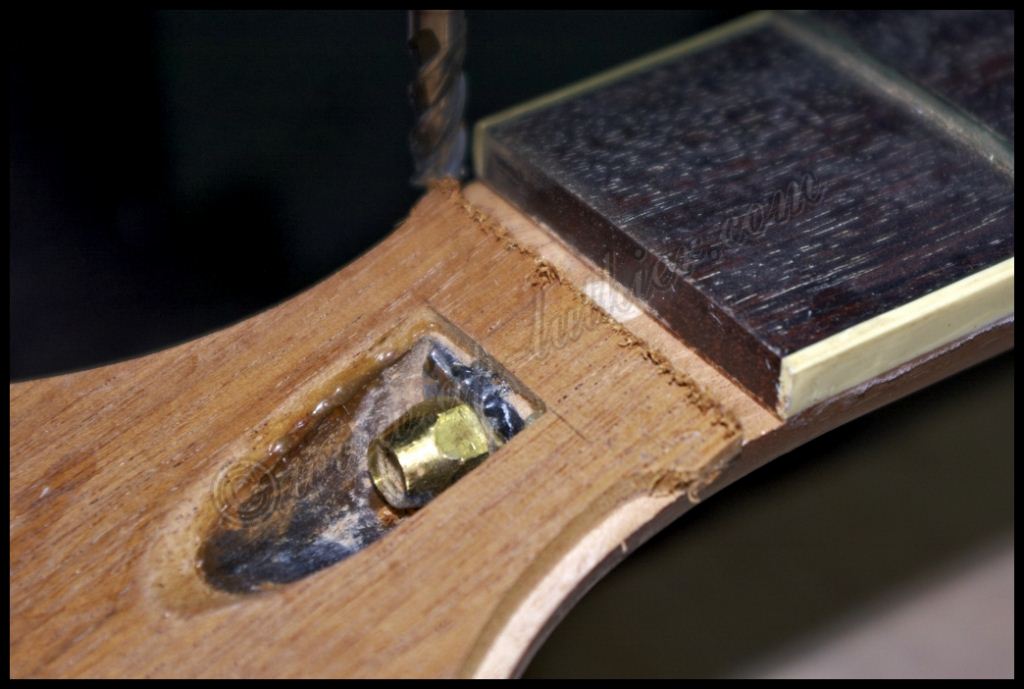
black-dye and ready for the finish
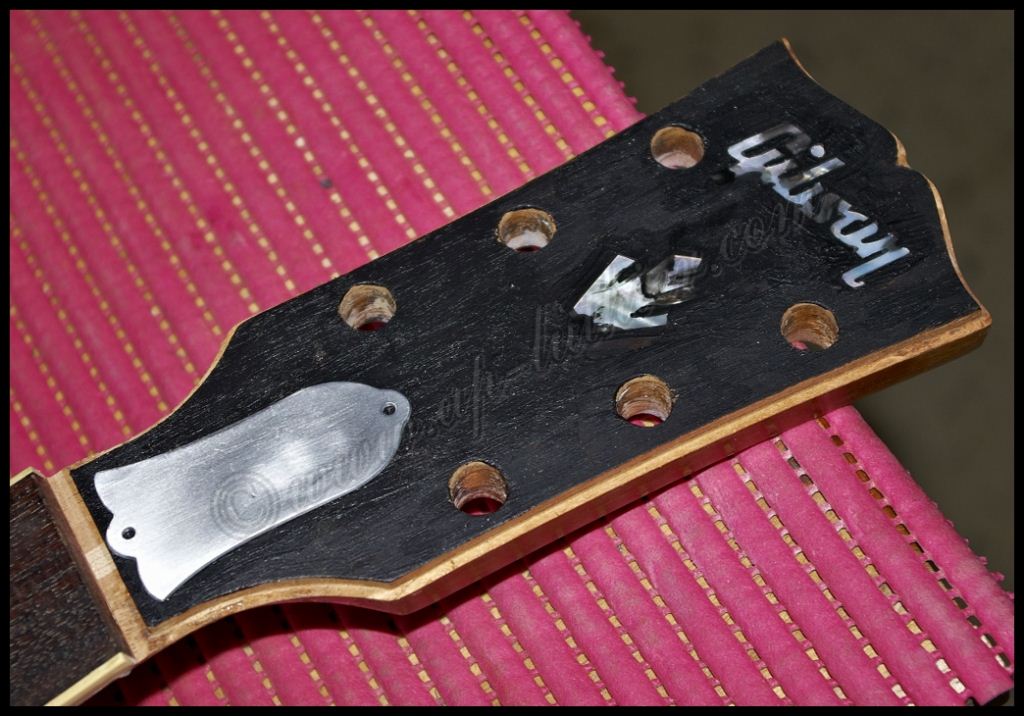
I mimic the dings and the look of "bad painted over" lettering and crown inlay as in Old Black, and start working on the bell truss rod cover, which will also be relic´d
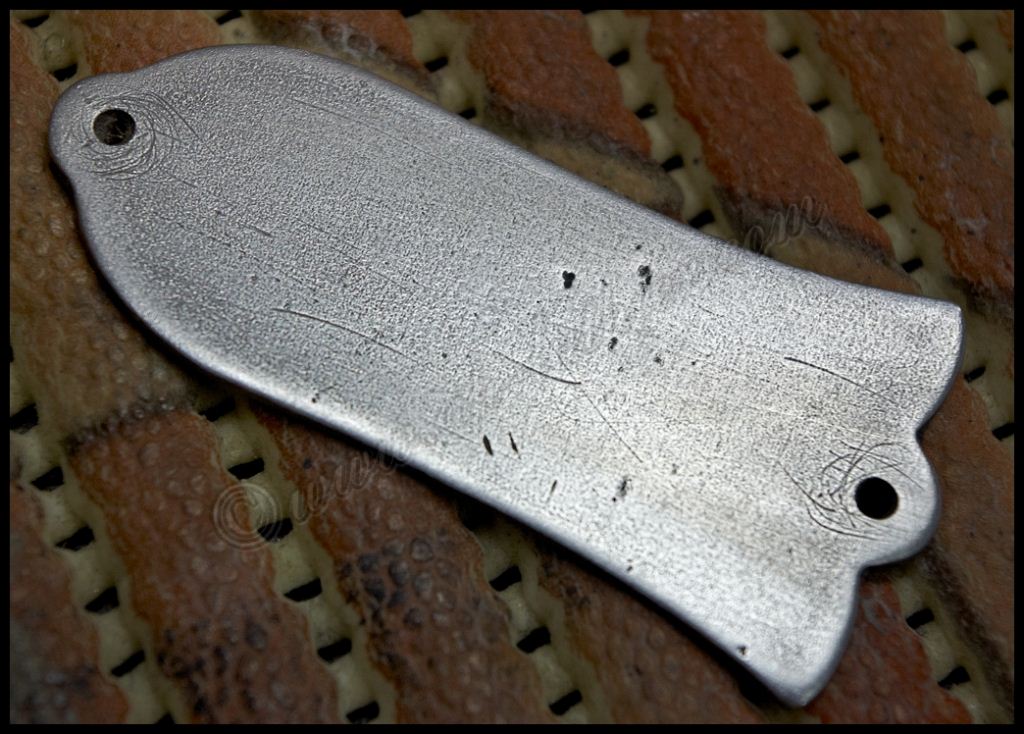
Little by little the relic´ing process shows the desired effects

Detail of the truss rod cover
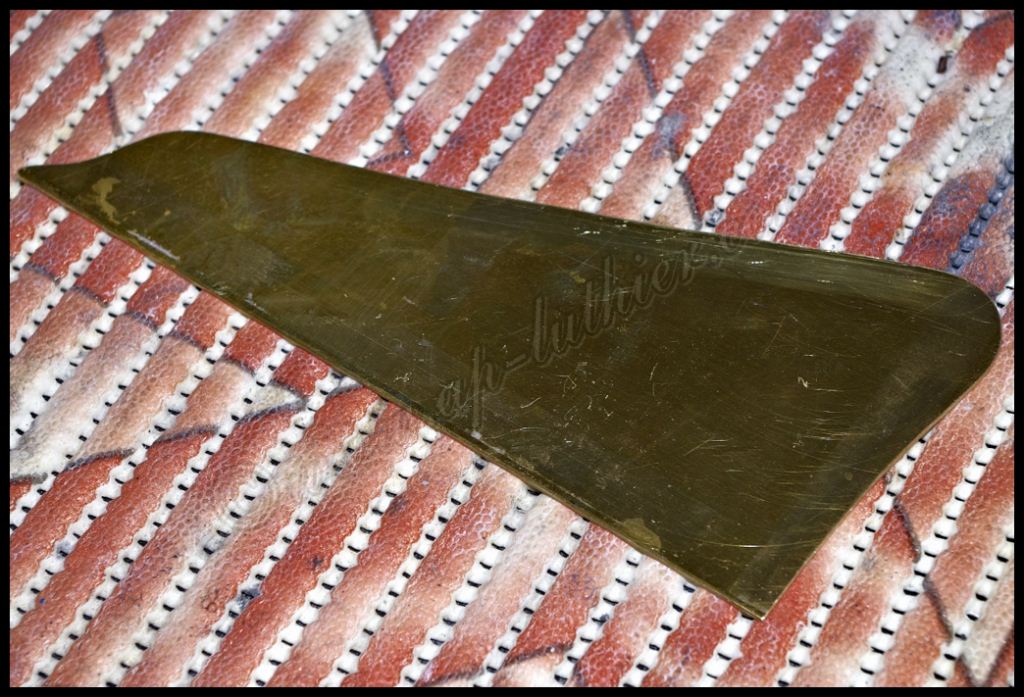
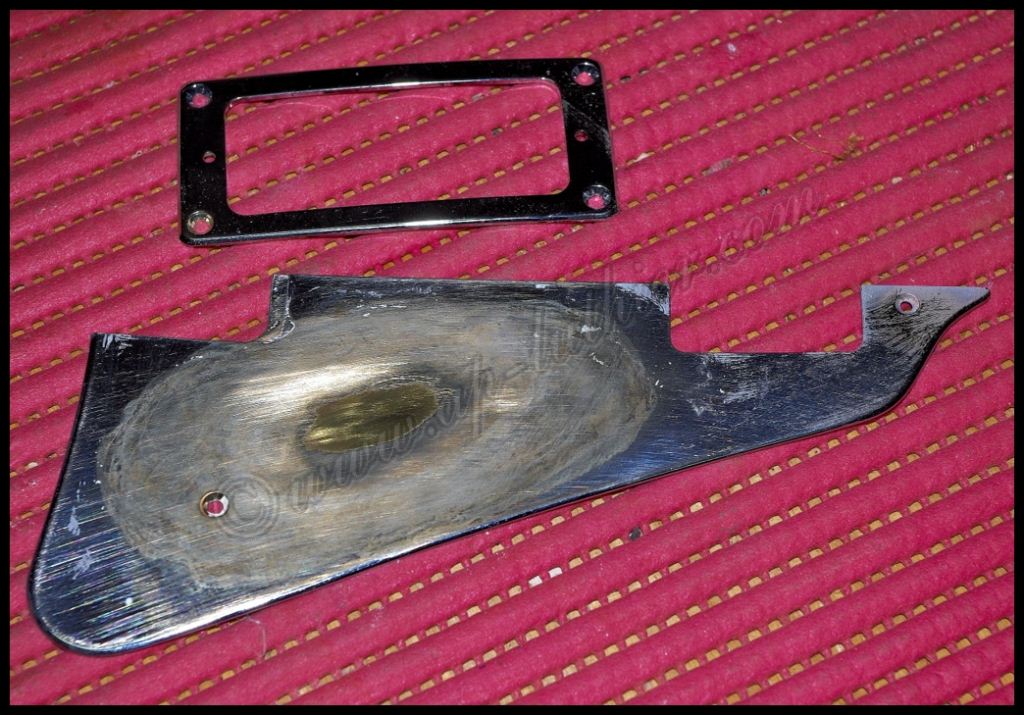
I only have the pickguard and the pickup frame still to make, which unlike the other metal parts on the guitar, are not made of aluminum, but chromed bronze. Here´s another example of a pre-form shape where it follows the same steps that I´ve already shown in other pieces, with the exception that these I´ve had them sent over to be chrome-plated to an specialist.
Whilst i wait for the chrome-plated pieces to arrive, I start to apply the primer on the headstock to ensure I don´t lose all the already made "changes"

Once the chrome-plated arrived, I had to relic them in order to simulate the use of so many years. Abrasive chemicals are applied and soon I get the wanted look
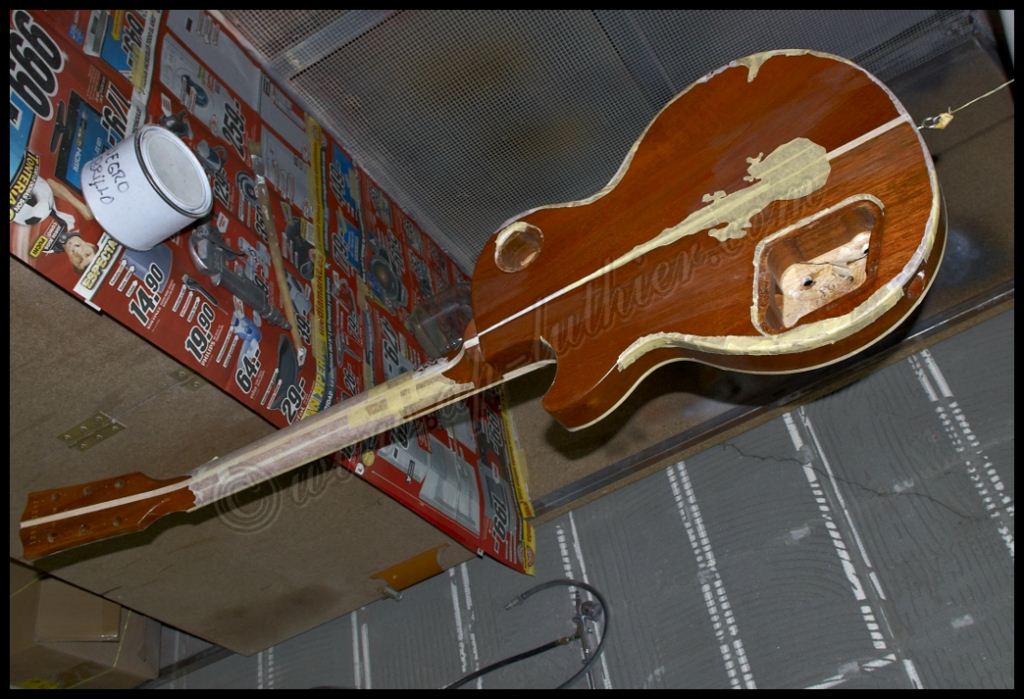
With everything ready, now it´s the wood´s turn. With already pre-formed pieces I start placing them in strategic places in order to get an "overall" shape of the wear I want to imitate
I then apply the black nitrocellulose
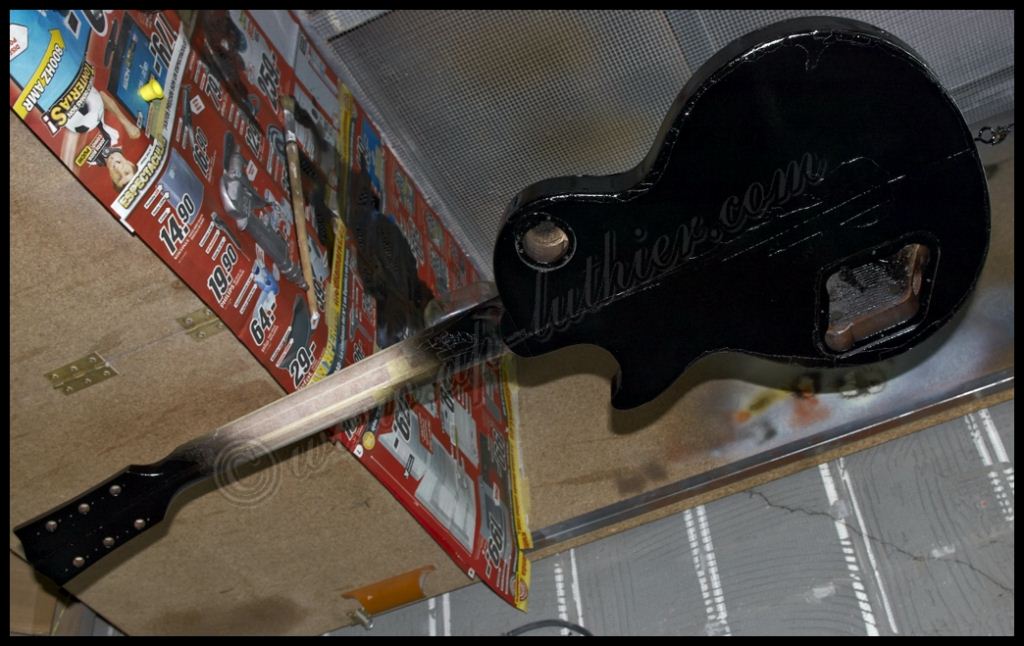

now left to dry out, I finally have all the hardware aged

After the finish is dry, I start working on the thorough job of mimicking every single crack, bump, scratch, etc in order to have it look as faithful to the original as possible. During this process I´ve had to build several tools from scratch to get the desired effects
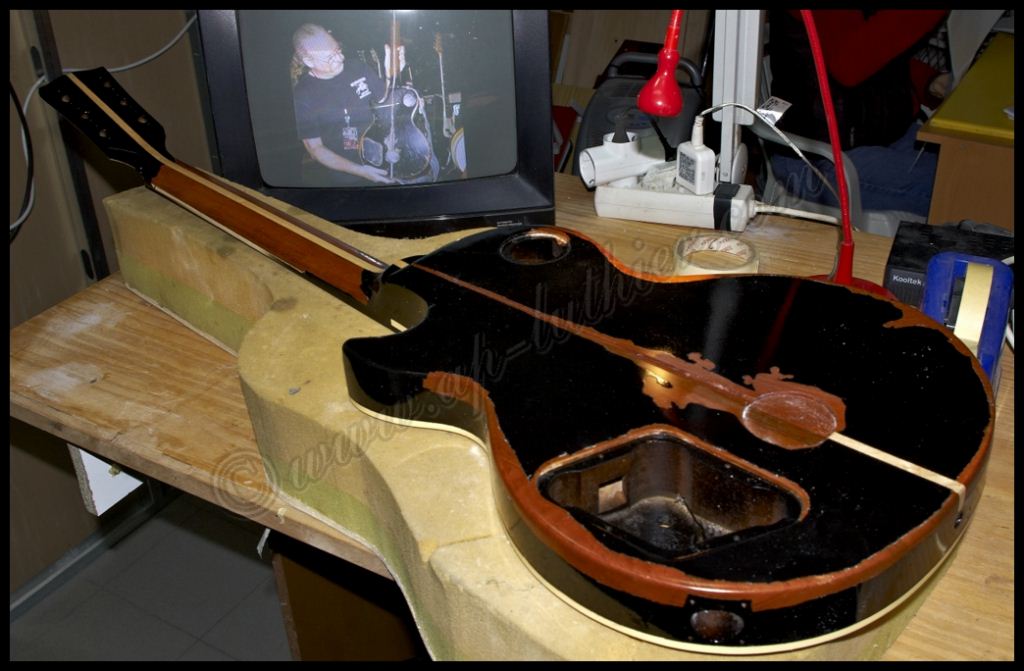
Couldn´t help to see the guitar with all the back plates and it radically changes the appearance, even though the full make-over is not yet finished
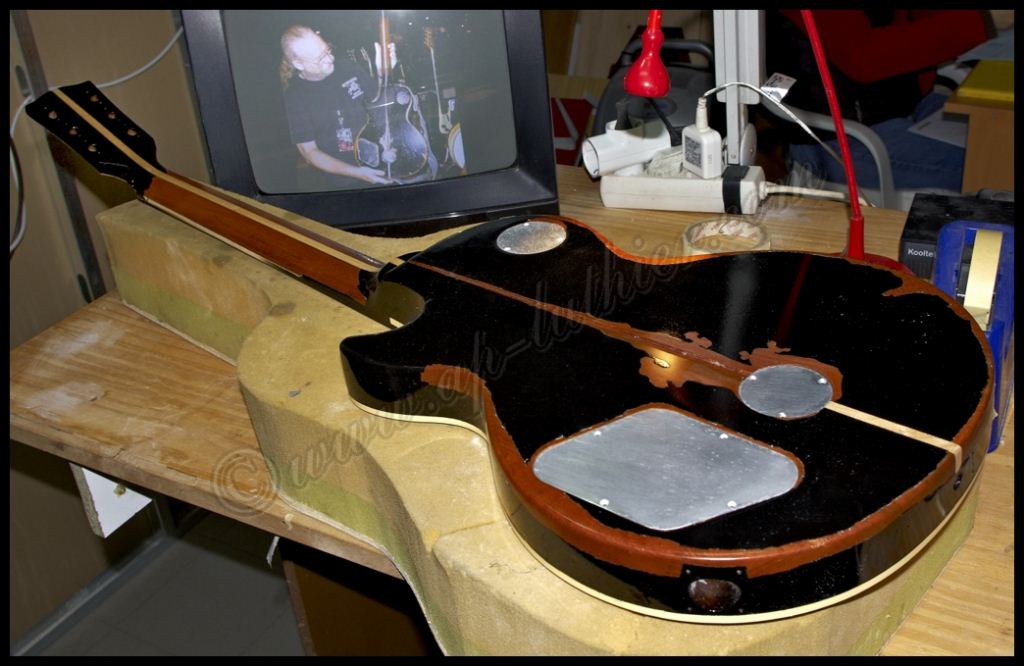
The "beginning" of the makeover. I type it in quotation marks as it was a beginning of many hours, and If you look closely to the TV in the back, there´s lots of detailing still to be made, although the guitar now really starts to resemble Old Black
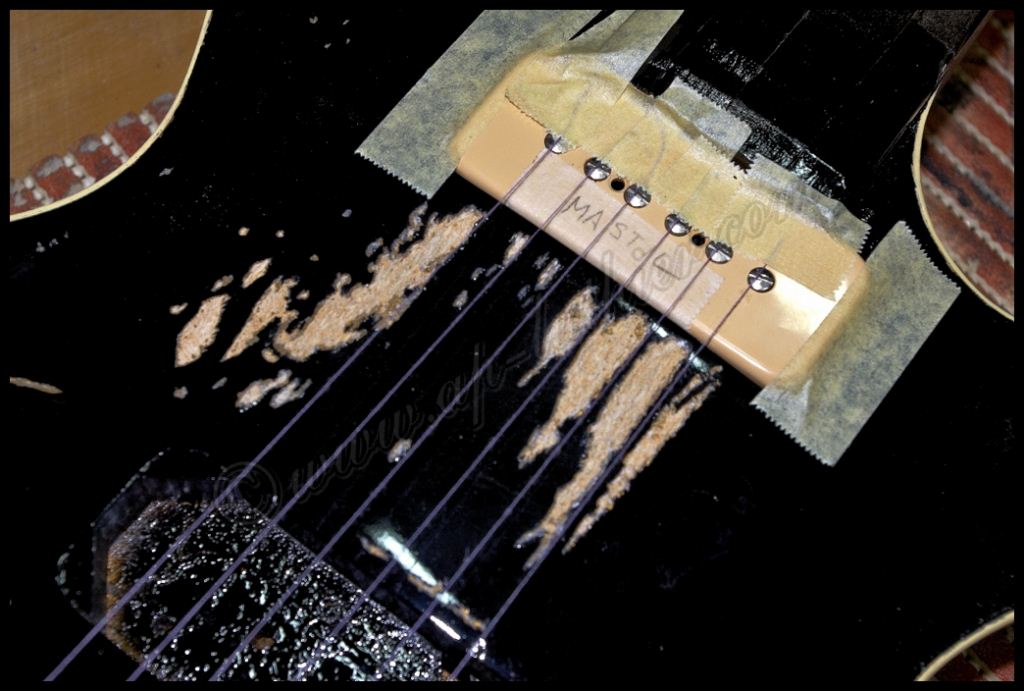
Same in the front, the most apparent work has been made, but the small detailing is what the most precision and time takes

Scratch marks from the pick just underneath the strings
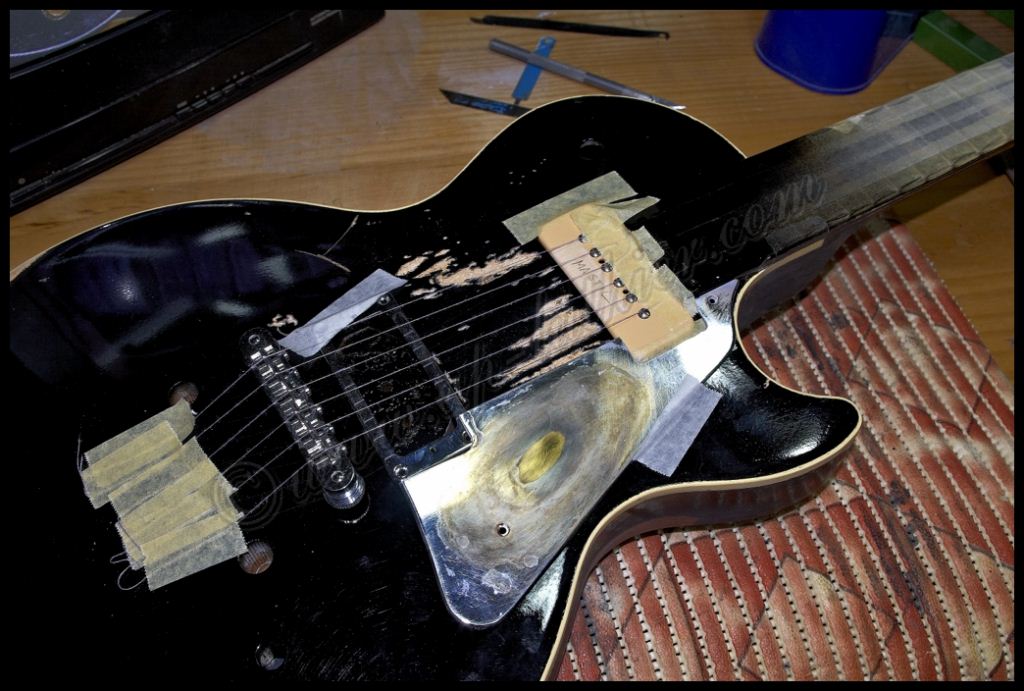
One pic of the guitar with the pickguard on it. Observe the binding, now the guitar´s Studio look is completely gone.
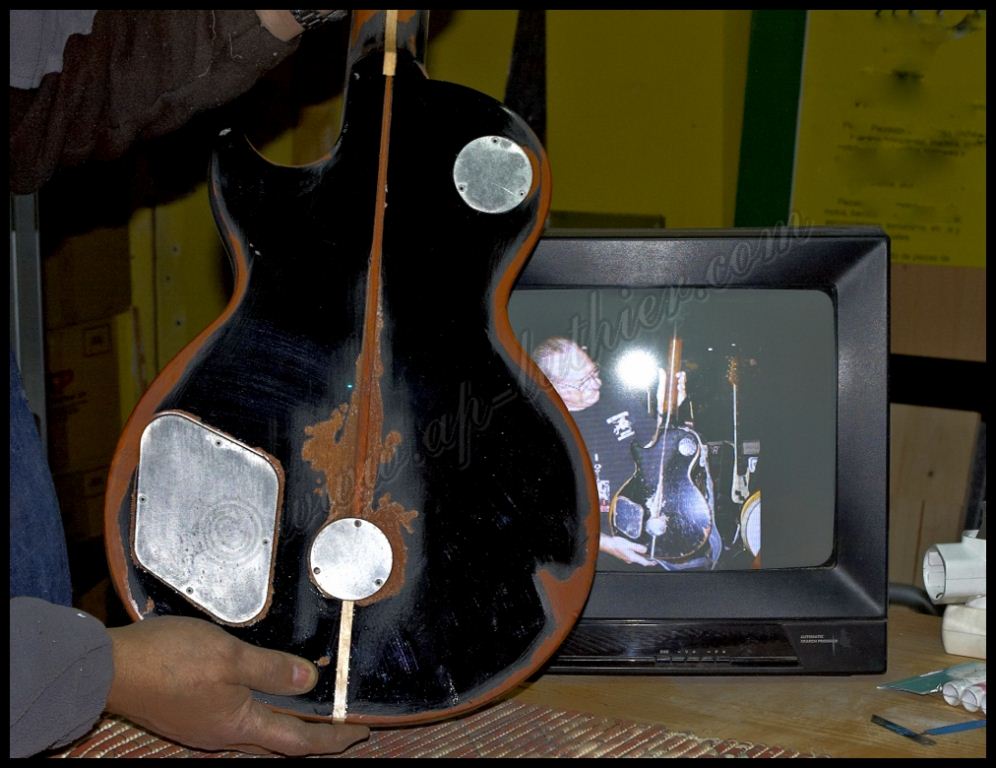
And I start with the relic´ing of the plates, mimicking all details on the original. a pic of the central back plate
Detail of the pickup switch cover plate
And detail of the electronics plate before applying the chemicals, which act very slowly but provide the heavy relic´ing effect that i want
Whilst all this heppens and the chemicals work their magic, I keep working on the headstock. Now it´s totally made of mahogany and more historically correct. I mill the space necessary for the nut and then rectify the access to the truss rod
black-dye and ready for the finish
I mimic the dings and the look of "bad painted over" lettering and crown inlay as in Old Black, and start working on the bell truss rod cover, which will also be relic´d
Little by little the relic´ing process shows the desired effects
Detail of the truss rod cover
I only have the pickguard and the pickup frame still to make, which unlike the other metal parts on the guitar, are not made of aluminum, but chromed bronze. Here´s another example of a pre-form shape where it follows the same steps that I´ve already shown in other pieces, with the exception that these I´ve had them sent over to be chrome-plated to an specialist.
Whilst i wait for the chrome-plated pieces to arrive, I start to apply the primer on the headstock to ensure I don´t lose all the already made "changes"
Once the chrome-plated arrived, I had to relic them in order to simulate the use of so many years. Abrasive chemicals are applied and soon I get the wanted look
With everything ready, now it´s the wood´s turn. With already pre-formed pieces I start placing them in strategic places in order to get an "overall" shape of the wear I want to imitate
I then apply the black nitrocellulose
now left to dry out, I finally have all the hardware aged
After the finish is dry, I start working on the thorough job of mimicking every single crack, bump, scratch, etc in order to have it look as faithful to the original as possible. During this process I´ve had to build several tools from scratch to get the desired effects
Couldn´t help to see the guitar with all the back plates and it radically changes the appearance, even though the full make-over is not yet finished
The "beginning" of the makeover. I type it in quotation marks as it was a beginning of many hours, and If you look closely to the TV in the back, there´s lots of detailing still to be made, although the guitar now really starts to resemble Old Black
Same in the front, the most apparent work has been made, but the small detailing is what the most precision and time takes
Scratch marks from the pick just underneath the strings
One pic of the guitar with the pickguard on it. Observe the binding, now the guitar´s Studio look is completely gone.
Old Black Neil Young Replica
I start working on the last aluminum piece to complete the Old Black hardware pieces. now that the finish of the neck pickup routing is ready, and I the correct measurements of the cavity are set
The neck pickup, originally comes with a plastic casing, which has been replaced by an aluminum cover, to match the rest of the hardware
I cut an aluminum sheet with the appropriate measurements to do the work

For this kind of work, if i were to to many different pieces, I would build a matrix to embed the aluminum, but instead, as I will only build one, I prefer to simplify the process and cheat a little. On the original the process must´ve been pretty similar

As you can see, the sheet is perfectly cut matching the internal shape.

In the next pic you can see the "ram" piece

Then i measure the radius of the external area (8mm) and

Prepare the mill for this specific radius and at the same time I prepare the cavity that will be used to embed the aluminum sheet in and give the right shape.

As you can see the original plastic part fits perfectly

Once the two wood pieces are set, I cut the aluminum sheet to give it shape. If i were to do the matrix in steel, it wouldn´t be necessary to cut the corners, and If i had a 300 ton press the sheet wouldn´t even be necessary, just by sheer pressure it´d take its shape, and it´s the regular procedure in a more industrialized process.
This is not the case, and I only have a 5 ton press, which is nevertheless enough for our purposes

Little by little the aluminum sheet starts fitting inside the mold

Finally i obtain the casing shape i was looking after. With it i have the starting point for the pickup cover

Before I start working on it I make sure the pickup fits inside with no issues and

I manually drill the holes for the pole pieces

Cut to the appropriate height and

making sure everything fits


I do some polishing on the case, as I´m after a "used" look it doesn´t need to look like a mirror, still needs to be relic´d

The relic´ing process

Some may ask the reason why one of the side has been cut and left "open" if everything fitted perfectly, but as Í´m creating a replica I have to even recreate the mistakes, and if you look closely to the original, this side of the pickup cover is missing also. My guess is that the person working on the original didn´t do a great job and had to improvise in order for the pickup to fit inside the casing, and had to cut one of the sides and leave that side next to the pickup guard in order to hide it. This is just pure guessing as I haven´t found any proper information about it.

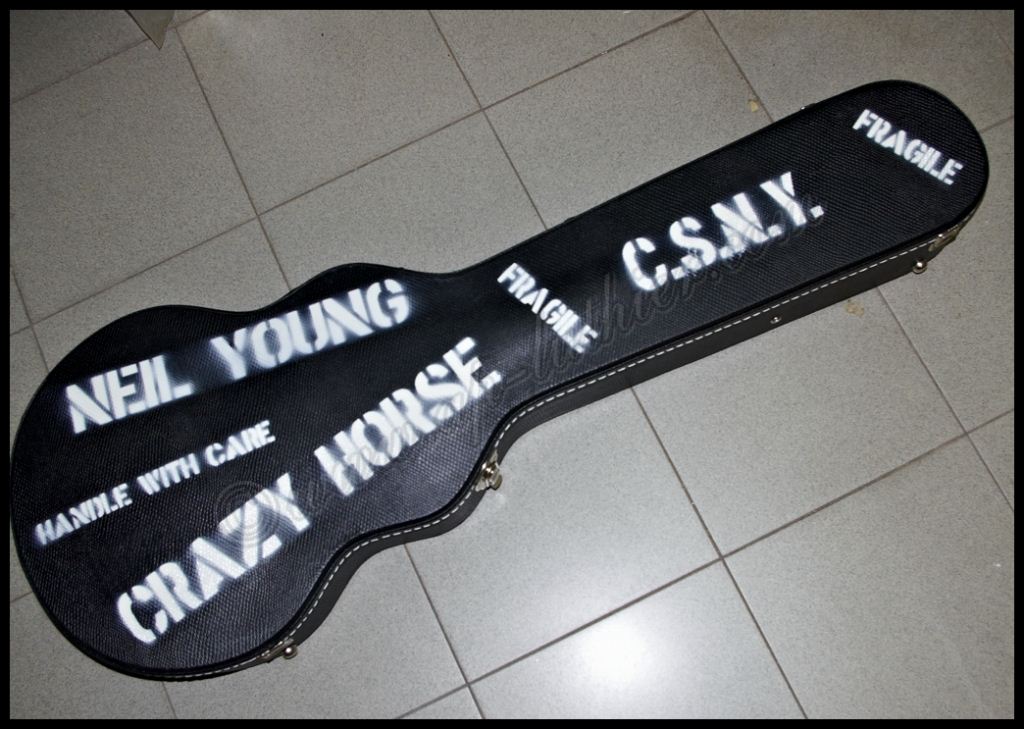
I´ve also received questions about the hard case. Yes, it also matches the guitar, I´m on it


Here it is ready to paint the lettering

I start working on the last aluminum piece to complete the Old Black hardware pieces. now that the finish of the neck pickup routing is ready, and I the correct measurements of the cavity are set
The neck pickup, originally comes with a plastic casing, which has been replaced by an aluminum cover, to match the rest of the hardware
I cut an aluminum sheet with the appropriate measurements to do the work
For this kind of work, if i were to to many different pieces, I would build a matrix to embed the aluminum, but instead, as I will only build one, I prefer to simplify the process and cheat a little. On the original the process must´ve been pretty similar
As you can see, the sheet is perfectly cut matching the internal shape.
In the next pic you can see the "ram" piece
Then i measure the radius of the external area (8mm) and
Prepare the mill for this specific radius and at the same time I prepare the cavity that will be used to embed the aluminum sheet in and give the right shape.
As you can see the original plastic part fits perfectly
Once the two wood pieces are set, I cut the aluminum sheet to give it shape. If i were to do the matrix in steel, it wouldn´t be necessary to cut the corners, and If i had a 300 ton press the sheet wouldn´t even be necessary, just by sheer pressure it´d take its shape, and it´s the regular procedure in a more industrialized process.
This is not the case, and I only have a 5 ton press, which is nevertheless enough for our purposes
Little by little the aluminum sheet starts fitting inside the mold
Finally i obtain the casing shape i was looking after. With it i have the starting point for the pickup cover
Before I start working on it I make sure the pickup fits inside with no issues and
I manually drill the holes for the pole pieces
Cut to the appropriate height and
making sure everything fits
I do some polishing on the case, as I´m after a "used" look it doesn´t need to look like a mirror, still needs to be relic´d
The relic´ing process
Some may ask the reason why one of the side has been cut and left "open" if everything fitted perfectly, but as Í´m creating a replica I have to even recreate the mistakes, and if you look closely to the original, this side of the pickup cover is missing also. My guess is that the person working on the original didn´t do a great job and had to improvise in order for the pickup to fit inside the casing, and had to cut one of the sides and leave that side next to the pickup guard in order to hide it. This is just pure guessing as I haven´t found any proper information about it.
I´ve also received questions about the hard case. Yes, it also matches the guitar, I´m on it
Here it is ready to paint the lettering
Old Black Neil Young Replica
Until now there´s only two different versions I´ve seen of the hard case. Apparently, the first one was a copy of a Japan made issue, and the one below was done by Gibson, which Neil asked to cancel and stop production. There´s very little information regarding the case, and it´s important to know whether is accurate. With a computer design program I´ve prepared two different formats to see which one we finally choose.

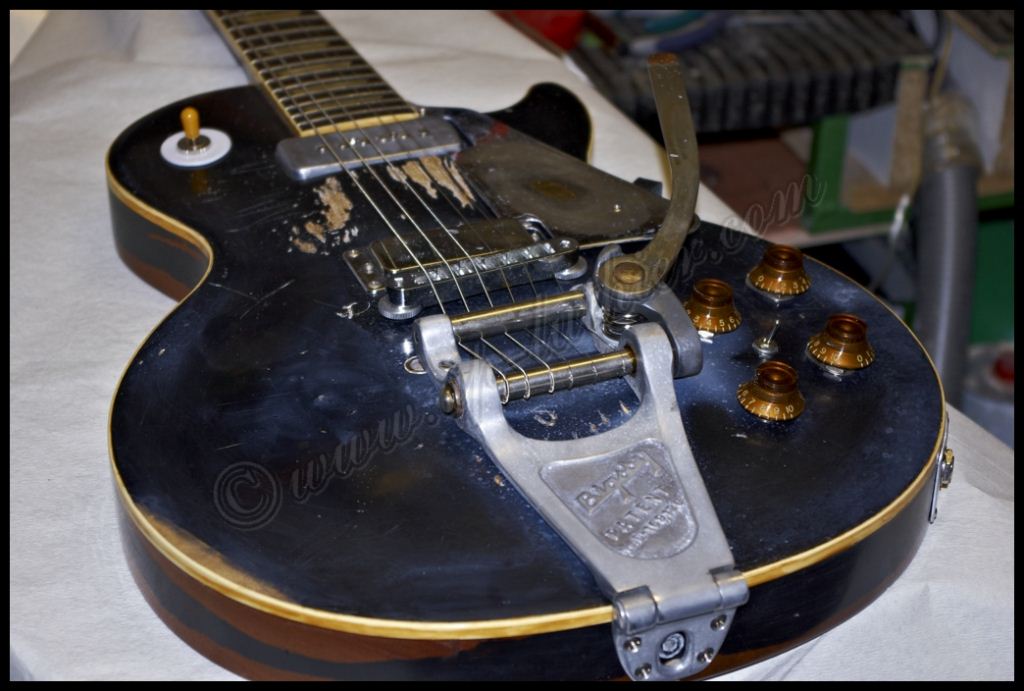
A pic with all parts mounted on the guitar. I´m doing this in order to better identify all the scars, dings & dongs that I´ll have to imitate accurately.

Me in action working on the wear underneath the strings between the pickups


Working on simulating the sweat and dirt that the original has after so many years of use

here´s one of the many tools I´ve built to simulate the different scars that leave marks on a guitar, such as belts, rings, blows, etc

At the beginning I said i was going to cover all the stop bar holes, and indeed i covered them all before applying the finish. The original ´53 model didn´t have this type of bridge. Hence my decision. Nevertheless, when fitting all the hardware pieces, there was something just not right. As the pic I was using to identify all the details on the guitar was of poor quality, i didn´t notice it and I thought of it to be some kind of bump or just wear, but paying close attention I was kind of surprised to find out that it wasn´t that but the stop bar hole.
It seems that before putting the Bigsby on, this guitar had a stop bar as any other Gibson Standard as known these days, which re-inforces my theory that the switch that´s between the knobs was originally located in the area that´s now underneath the Bigsby.
Finally I had to drill the appropriate holes in order to make it look like when it was a Goldtop.

Back to work on the guitar after the previous finishing process, which takes its time because of the waiting periods of the applied producuts. The relic´ing is very noticeable, specially on the binding. Old guitars shows this marks of the time gone past, and where nitro-lacquer changes and wears of on the areas where there´s more contact with hands, belts, clothing, etc.

I´ve seen a lot of 50s and 60s guitars, and it´s not so difficult to imitate this process, as they more or less show this wear in specific areas.

These "darkenings" only appear on nitro-lacquer finished areas, not where there´s no finish.


Getting to the last stages of this replica work, I finish off the last detals, and I notice that the pickup switch plate is not made of aluminum, like other parts of the guitar, but a white plastic material apparently. I´ve checked lots of pics to verify this, and in all of them it´s clearly showing that it´s not "metallic" and I´ve come to the conclusion that it´s just a white piece of plastic. I´m not sure whether it´s the original that has been turned around to not show the usual "rhythm-treble" lettering or a different piece. Anyway, I´ve made it white acrylic teflon for maximum hardness and flexibility. The switch tip has been swapped by a vintage one.

Another part that was still not finished was the aluminum jack plate.

Here you can see it finished, only some relic´ing was still to be done in order to give it its right appearance

In this guitar, the only detail not exact as in the original is the bridge.
In my opinion, Gibson has designed, in their Nashville bridge, a better one than the original ABR-1.
The ABR-1, the bridge used back in the day by Gibson, was put on Old Black in a later stage instead of its original bridge. The easiest and quickest would´ve been for me to fill in the holes left by the Nashville and replaced it by the ABR-1, but the Nashville is superior than the ABR-1, as well as having all the attributes of its predecessor, it has more mass, the saddles can have more "space" to move with which one can use higher gauge strings. In fact, modern bridges seem to imitate the Nashville more than the ABR-1.
The only exception is the way the bridge is attached to the body. There lies the BIG difference. Its vibration transmission system is not as perfect as the ABR-1, but this has been solved already many years ago with a very simple invention that provides the Nashville to have the same efficiency in this regard as the ABR-1.
My own version of it is the Nash2ABR, here you can check it out:
Nash2ABR
What you will allow me is to explain how this invention was born and the reason why it won´t be used in this replica
When playing a Les Paul or another guitar with a Nashville bridge, it´s easy to feel its ease and comfort of it, the sound, etc, until...One plays the same guitar with an ABR-1 and there´s a noticeable difference favouring the latter. Why?. That´s the question i was making to myself until I had my first Les Paul model in 1970. There was something missing and that increrased the frequencies in one guitar and missing in others.
During the mid-90s, when the Internet was still an infant, and we were in awe of its possibilities, I had the opportunity to download several patents from different guitar manufacturers, who had kindly allowed people to download openly to the public. Regrettably that hard drive (3 gb) where I stored the information, a revolution in technology of the era, died on me, and I lost all of that valuable material, which is very difficult to find on the internet nowadays.
Anyway, on one of those patents, there was an schematic from Mr. Ted McCarty showed his projects for the patent application of the Tune-O-Matic bridge, which originally was used on Gibson Les Paul Customs, to use it on other guitars at the same factory. As you know, the first model was the ABR-1, which would be eventually replaced by the Nashville. There´s another patent application with more detail, as a way of speaking, that shows with thorough detail the intention of getting the screws to touch the wood on the Nashville bridge. Basically, an ABR-1 modified with the newer technology available at the time. I can´t show you this as I lost it and haven´t been able to find it again on the net, and i want to avoid misinterpretations as I don´t have the original patent document.
Miraculously i could find the original patent (not the latter), although it´s not the main one on which I based my own modification, it´s the one in which Ted´s principle ideas hasve been based on:

As you can see, Ted MacCarty already was specifying at the time the relevance of the screw pins to touch the wood.

In this detail of the previous pic you can see how he makes emphasis on the contact points 6, 30, 31, 32, 34, 35. This ignited my curiosity back then to investigate about this system and where the key was, as Ted was showing us, it was very important that the axis would made direct contact with the sides as with the bottom.
Indeed, the key was there.
The decision of leaving the Nashville bridge comes directly from the customer who ordered the work on the guitar, as intelligently, like he wants the most faithful replica possible, his priority is also to have a 1st class instrument, which gives its full potential and at the same time works perfectly.
What it´s most noticeable in a Nashville bridge, is the anchors attaching it to the guitar body.
When mounting all the parts on the guitar, and the bridge specifically, and comparing it with a pic of the original Old Black, something was just not right. Hence, I opted to do the following:
I grabbed a piece of ebony, wood largely used by its mechanic and acoustic properties on bridges, of which i have leftovers from fingerboards, and I made a bar piece.

With that ebony bar i made two threaded pieces

Painted black they are almost unnoticeable at the base of the bridge and perform their function with no issue.

Until now there´s only two different versions I´ve seen of the hard case. Apparently, the first one was a copy of a Japan made issue, and the one below was done by Gibson, which Neil asked to cancel and stop production. There´s very little information regarding the case, and it´s important to know whether is accurate. With a computer design program I´ve prepared two different formats to see which one we finally choose.
A pic with all parts mounted on the guitar. I´m doing this in order to better identify all the scars, dings & dongs that I´ll have to imitate accurately.
Me in action working on the wear underneath the strings between the pickups
Working on simulating the sweat and dirt that the original has after so many years of use
here´s one of the many tools I´ve built to simulate the different scars that leave marks on a guitar, such as belts, rings, blows, etc
At the beginning I said i was going to cover all the stop bar holes, and indeed i covered them all before applying the finish. The original ´53 model didn´t have this type of bridge. Hence my decision. Nevertheless, when fitting all the hardware pieces, there was something just not right. As the pic I was using to identify all the details on the guitar was of poor quality, i didn´t notice it and I thought of it to be some kind of bump or just wear, but paying close attention I was kind of surprised to find out that it wasn´t that but the stop bar hole.
It seems that before putting the Bigsby on, this guitar had a stop bar as any other Gibson Standard as known these days, which re-inforces my theory that the switch that´s between the knobs was originally located in the area that´s now underneath the Bigsby.
Finally I had to drill the appropriate holes in order to make it look like when it was a Goldtop.
Back to work on the guitar after the previous finishing process, which takes its time because of the waiting periods of the applied producuts. The relic´ing is very noticeable, specially on the binding. Old guitars shows this marks of the time gone past, and where nitro-lacquer changes and wears of on the areas where there´s more contact with hands, belts, clothing, etc.
I´ve seen a lot of 50s and 60s guitars, and it´s not so difficult to imitate this process, as they more or less show this wear in specific areas.
These "darkenings" only appear on nitro-lacquer finished areas, not where there´s no finish.
Getting to the last stages of this replica work, I finish off the last detals, and I notice that the pickup switch plate is not made of aluminum, like other parts of the guitar, but a white plastic material apparently. I´ve checked lots of pics to verify this, and in all of them it´s clearly showing that it´s not "metallic" and I´ve come to the conclusion that it´s just a white piece of plastic. I´m not sure whether it´s the original that has been turned around to not show the usual "rhythm-treble" lettering or a different piece. Anyway, I´ve made it white acrylic teflon for maximum hardness and flexibility. The switch tip has been swapped by a vintage one.
Another part that was still not finished was the aluminum jack plate.
Here you can see it finished, only some relic´ing was still to be done in order to give it its right appearance
In this guitar, the only detail not exact as in the original is the bridge.
In my opinion, Gibson has designed, in their Nashville bridge, a better one than the original ABR-1.
The ABR-1, the bridge used back in the day by Gibson, was put on Old Black in a later stage instead of its original bridge. The easiest and quickest would´ve been for me to fill in the holes left by the Nashville and replaced it by the ABR-1, but the Nashville is superior than the ABR-1, as well as having all the attributes of its predecessor, it has more mass, the saddles can have more "space" to move with which one can use higher gauge strings. In fact, modern bridges seem to imitate the Nashville more than the ABR-1.
The only exception is the way the bridge is attached to the body. There lies the BIG difference. Its vibration transmission system is not as perfect as the ABR-1, but this has been solved already many years ago with a very simple invention that provides the Nashville to have the same efficiency in this regard as the ABR-1.
My own version of it is the Nash2ABR, here you can check it out:
Nash2ABR
What you will allow me is to explain how this invention was born and the reason why it won´t be used in this replica
When playing a Les Paul or another guitar with a Nashville bridge, it´s easy to feel its ease and comfort of it, the sound, etc, until...One plays the same guitar with an ABR-1 and there´s a noticeable difference favouring the latter. Why?. That´s the question i was making to myself until I had my first Les Paul model in 1970. There was something missing and that increrased the frequencies in one guitar and missing in others.
During the mid-90s, when the Internet was still an infant, and we were in awe of its possibilities, I had the opportunity to download several patents from different guitar manufacturers, who had kindly allowed people to download openly to the public. Regrettably that hard drive (3 gb) where I stored the information, a revolution in technology of the era, died on me, and I lost all of that valuable material, which is very difficult to find on the internet nowadays.
Anyway, on one of those patents, there was an schematic from Mr. Ted McCarty showed his projects for the patent application of the Tune-O-Matic bridge, which originally was used on Gibson Les Paul Customs, to use it on other guitars at the same factory. As you know, the first model was the ABR-1, which would be eventually replaced by the Nashville. There´s another patent application with more detail, as a way of speaking, that shows with thorough detail the intention of getting the screws to touch the wood on the Nashville bridge. Basically, an ABR-1 modified with the newer technology available at the time. I can´t show you this as I lost it and haven´t been able to find it again on the net, and i want to avoid misinterpretations as I don´t have the original patent document.
Miraculously i could find the original patent (not the latter), although it´s not the main one on which I based my own modification, it´s the one in which Ted´s principle ideas hasve been based on:
As you can see, Ted MacCarty already was specifying at the time the relevance of the screw pins to touch the wood.
In this detail of the previous pic you can see how he makes emphasis on the contact points 6, 30, 31, 32, 34, 35. This ignited my curiosity back then to investigate about this system and where the key was, as Ted was showing us, it was very important that the axis would made direct contact with the sides as with the bottom.
Indeed, the key was there.
The decision of leaving the Nashville bridge comes directly from the customer who ordered the work on the guitar, as intelligently, like he wants the most faithful replica possible, his priority is also to have a 1st class instrument, which gives its full potential and at the same time works perfectly.
What it´s most noticeable in a Nashville bridge, is the anchors attaching it to the guitar body.
When mounting all the parts on the guitar, and the bridge specifically, and comparing it with a pic of the original Old Black, something was just not right. Hence, I opted to do the following:
I grabbed a piece of ebony, wood largely used by its mechanic and acoustic properties on bridges, of which i have leftovers from fingerboards, and I made a bar piece.
With that ebony bar i made two threaded pieces
Painted black they are almost unnoticeable at the base of the bridge and perform their function with no issue.
Detail of the base attached to the guitar body. On a separate pic (later in this page) you can see the regular 4mm screw pin, with the nut as in the original.

I´ve also painted the hard shell case. Not being able to find a pic of the original (if there´s any), I´ve copied the design preferred by the customer.
Mounting the pieces to act as a guide in order to get the most similar appearance as the original.
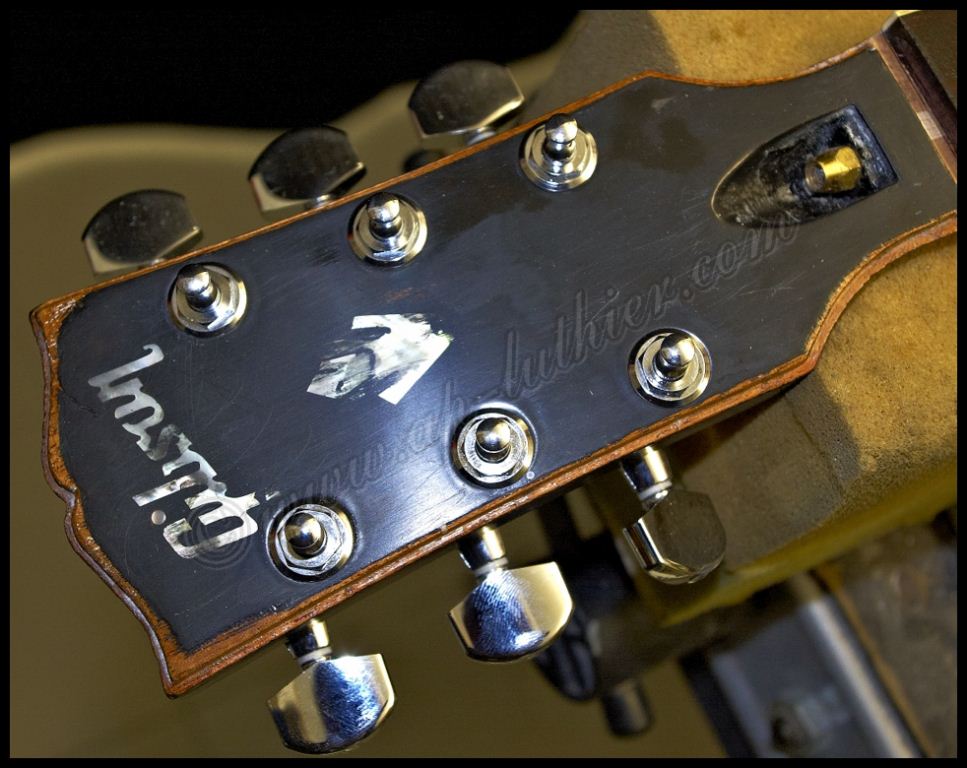
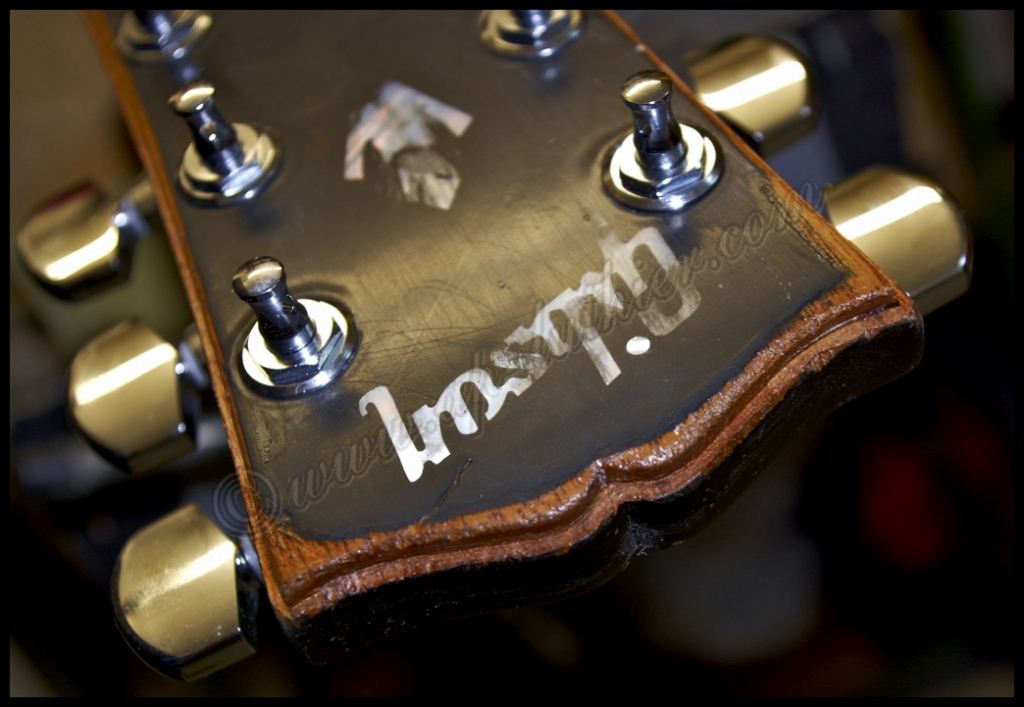
Being able to find this detail was difficult, but after watching several NY videos i got it and could now relic the headstock, which, to be honest, i´ve seen replicas of that don´t imitate this part too well.
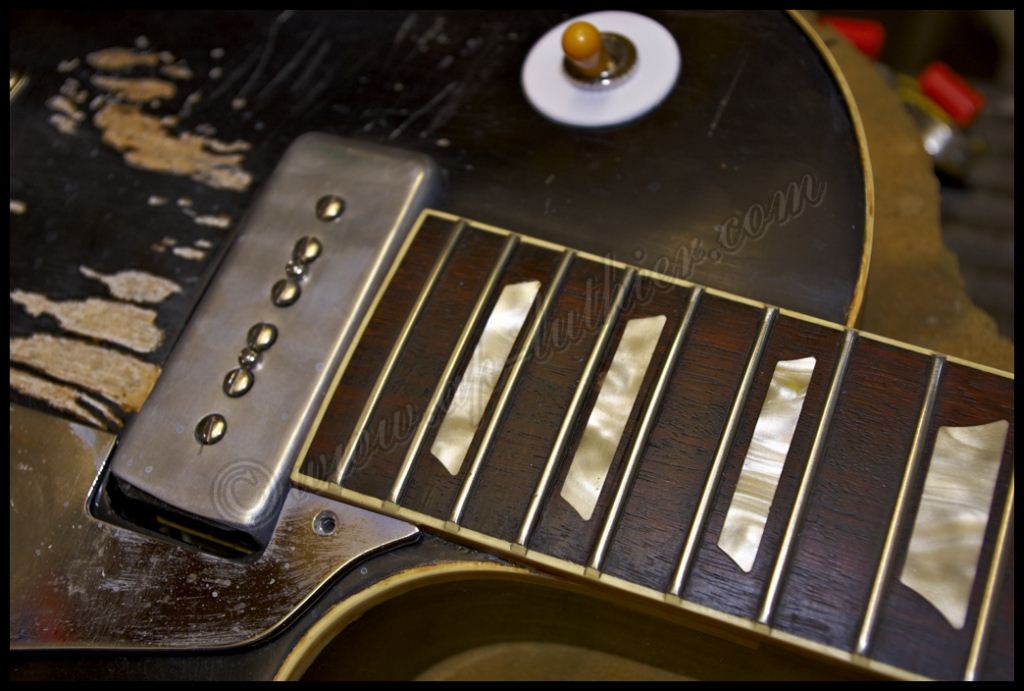
At last the frets and fingerboard see the light of day again

and day by day are getting the right effect
Step by step i work on the relic´ing on separate areas
View with the tuners installed
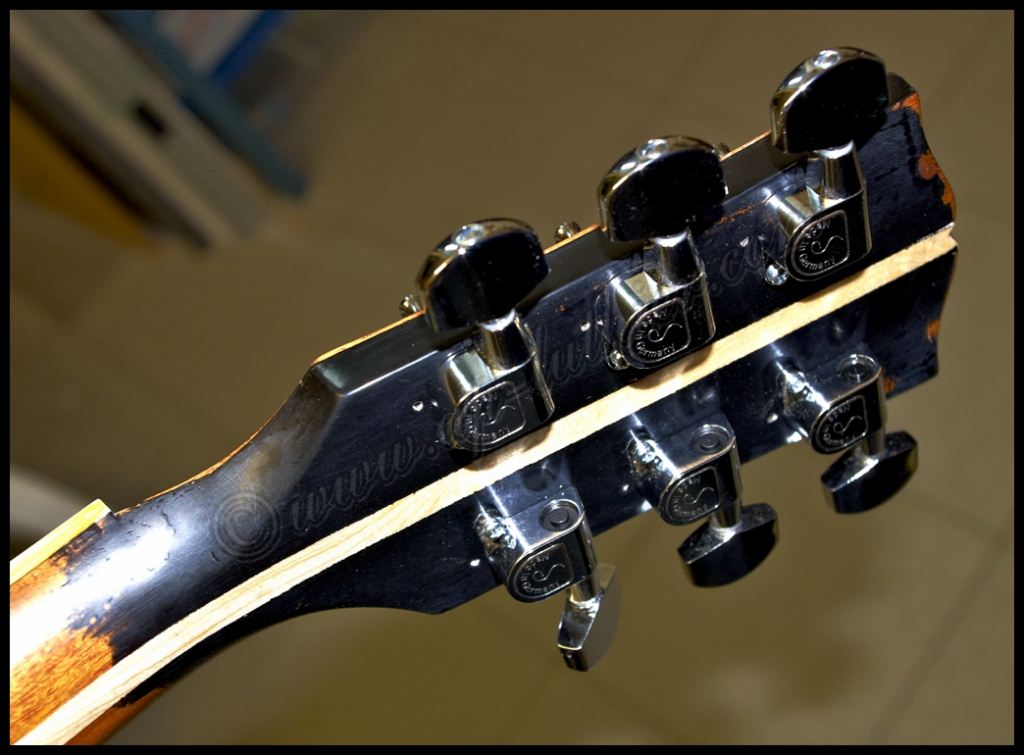
and how the headstock looks with them on
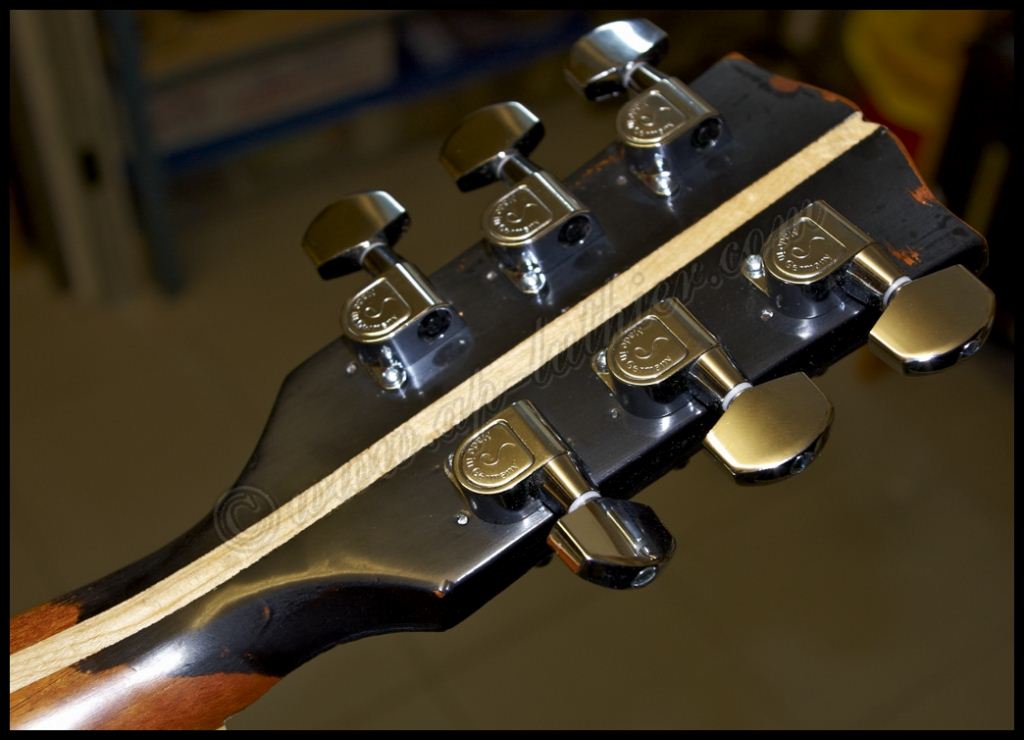
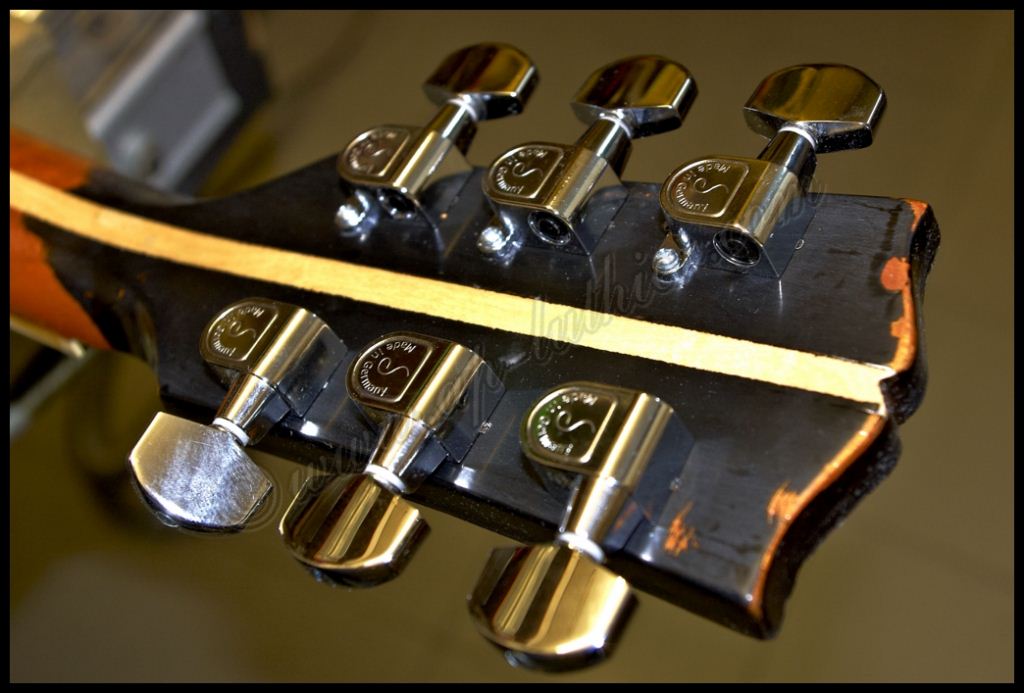
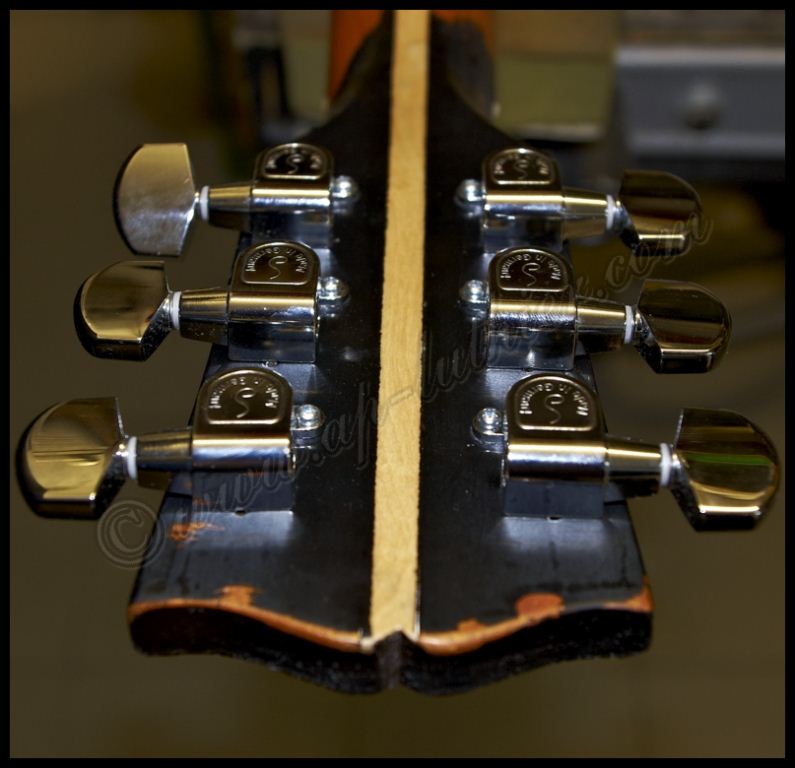
As I´ve mentioned previously, priority one has always been playability and sound rather than looks on this guitar. Hence, some specific parts like the fingerboard, fret levelling, neck, electronics, etc, are top quality.
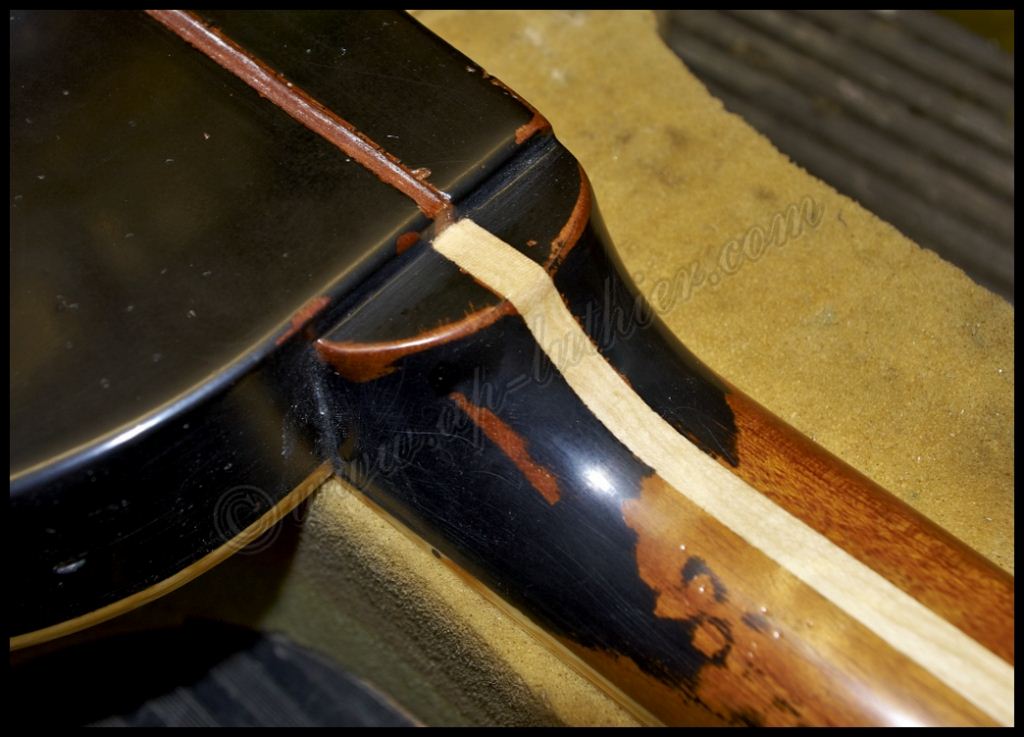
Detail of the neck

and the back where it joins the body
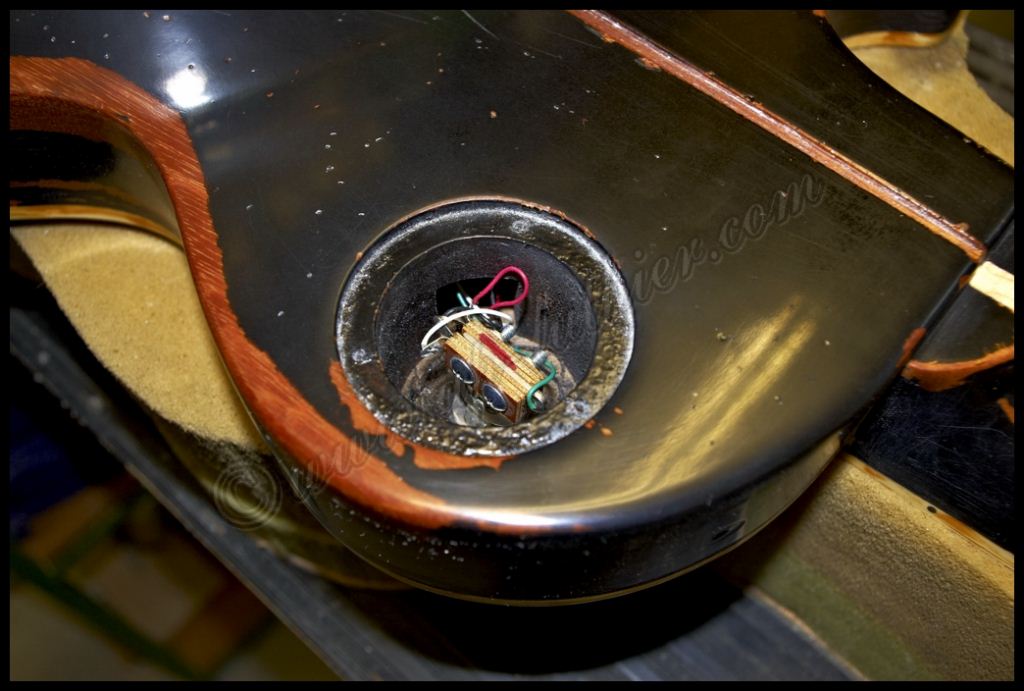
the switch selector cavity and the wear showing
I was "caught in the act" adjusting the nut
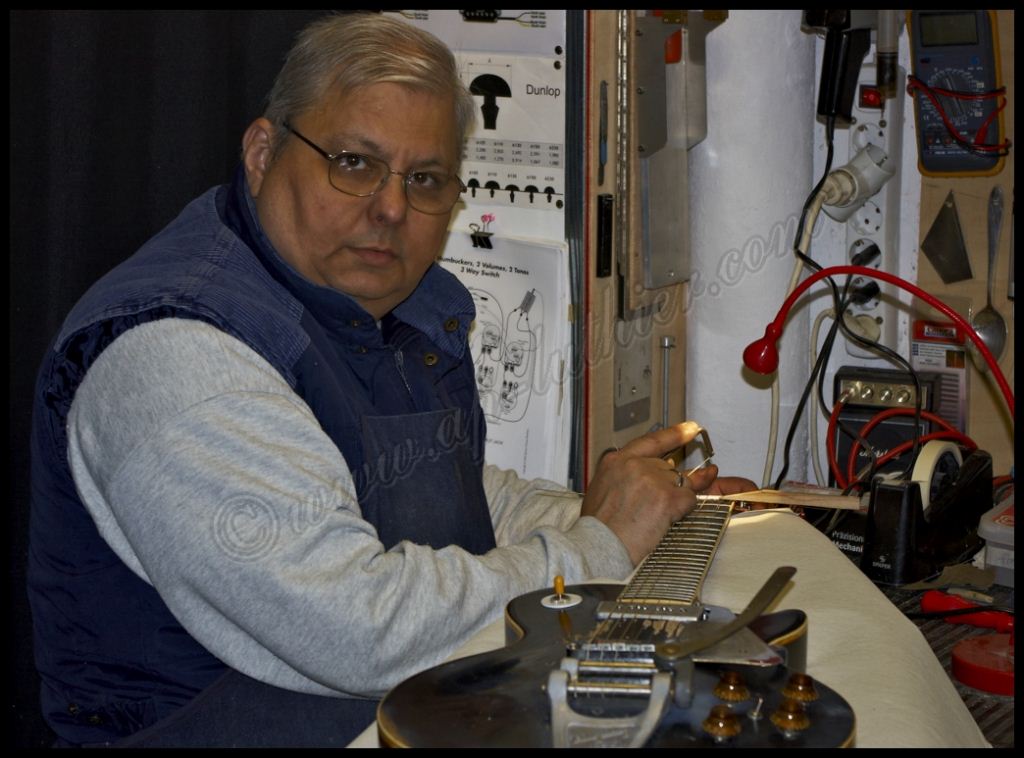
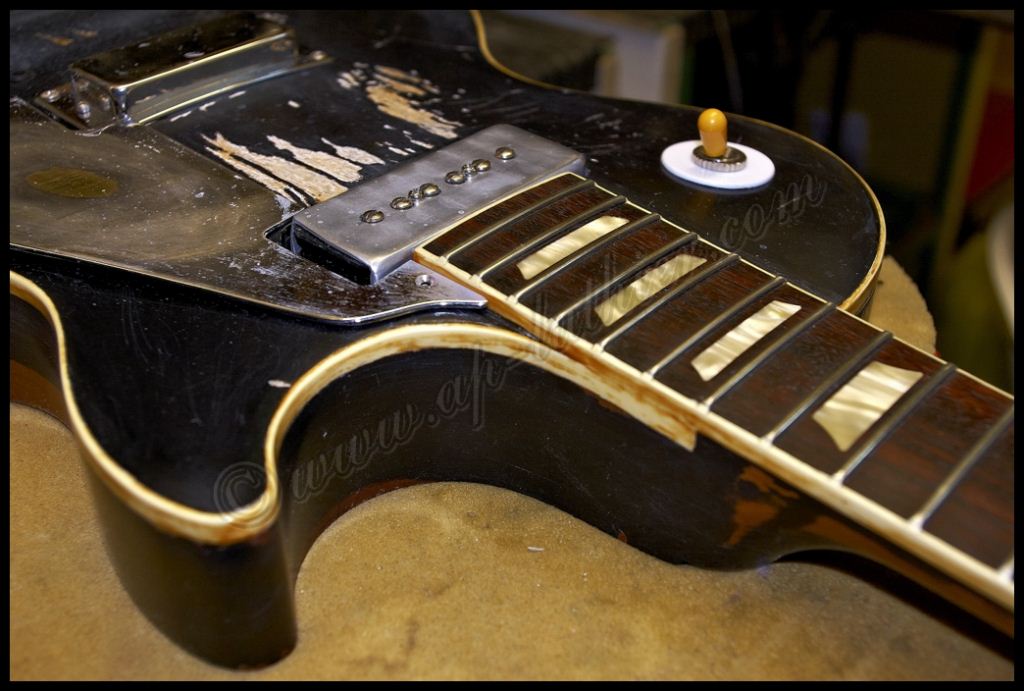
Little by little the guitar resembles more and more the original
Those who work setting up guitars, know that working on the electronics is a nightmare sometimes. Combining a single coil with a humbucker pickup is already a challenge, moreso P90s.
As many people would think, this is not easy and only trial and error is what has to be done, as what might work in one guitar, won´t in a different one.

Different pots, capacitors, resistors, etc in order to find the right sound.

This is another main point in a bridge, specifically on the saddles. Ensuring the strings perfectly fit is essential for an optimum transmission of sound. With special files one can manage to do it. In this pic you can see how this process starts to differentiate the grooves, on the right one the shape is in line with what it will hold, and the other two still awating their turn.

A macro shot of how the string perfectly fits on top of the saddle. This part is essential, especially when using a Bigsby bridge.

The other problem comes because of the using of the Nashville bridge. As it´s slightly wider than an ABR-1, it makes the string hit on the bridge´s edge. This is not a good thing, as because of the wound of the string there´s jumps and hitches, making the bridge unstable.

As you can see all strings stumble on that same edge.

The solution, a ramp with which the string is suspended in the air and no issues.

As mentioned several times through this project, the main importante is the sound. It doesn´t matter if the guitar is a look-a-like if it cannot sound like the original, or at least very close. A piece of fighting bull bone for the nut, is ideal for the perfect vibration transmission and also the strings fit accordingly.

Once ready the polishing begins

Only a little relic´ing and the nut is ready

Detail of the anchors of the Nashville bridge, which act with a similar efficiency as an ABR-1

Well, that is all my friends. Ready to ship to the owner. I will now leave the pictures speak for themselves.


The icing on the cake. A pic made by the owner with the peace & dove strap.

Some friends visited to have a look at the guitar, and I video´d with a very old handheld camera (Canon Ixux 60) and a humble Laney LC15R. Although the sound is not great, one can appreciate that the guitar´s got soul.
A real pleasure being able to work in this project.
As a final point here is playing his own versions of Neil and Pearl Jam
Cinnamon Girl of Neil Young
Bridge pickup
Rocking In The Free World of Neil Young
Bridge + neck pickup
Solo bridge pickup directly to the jack
Black of Pearl Jam
Neck Pickup